|
|
Post by swanrail on Nov 13, 2007 19:08:29 GMT 1
I have been chewing over this new part for some time, and following other comments with interest. Having now completed the second planking at the stern, I tried the new part and to my surprise, found that it fitted perfectly!!! Part 63 does finish some 2mm inside the part 70, but I now find that this is intentional. Looking at Markus's model stern, he seems to have a filler plank covering the edges of the plywood, so I have done the same. My stern now has the filler part fitted (thanks to the good old kettle steamer and gash wood from my other models and all looks good. I have deliberately left the filler piece too high, in the hope that it can form the waterway plank for when I fit my new deck technique. Pictures below:: 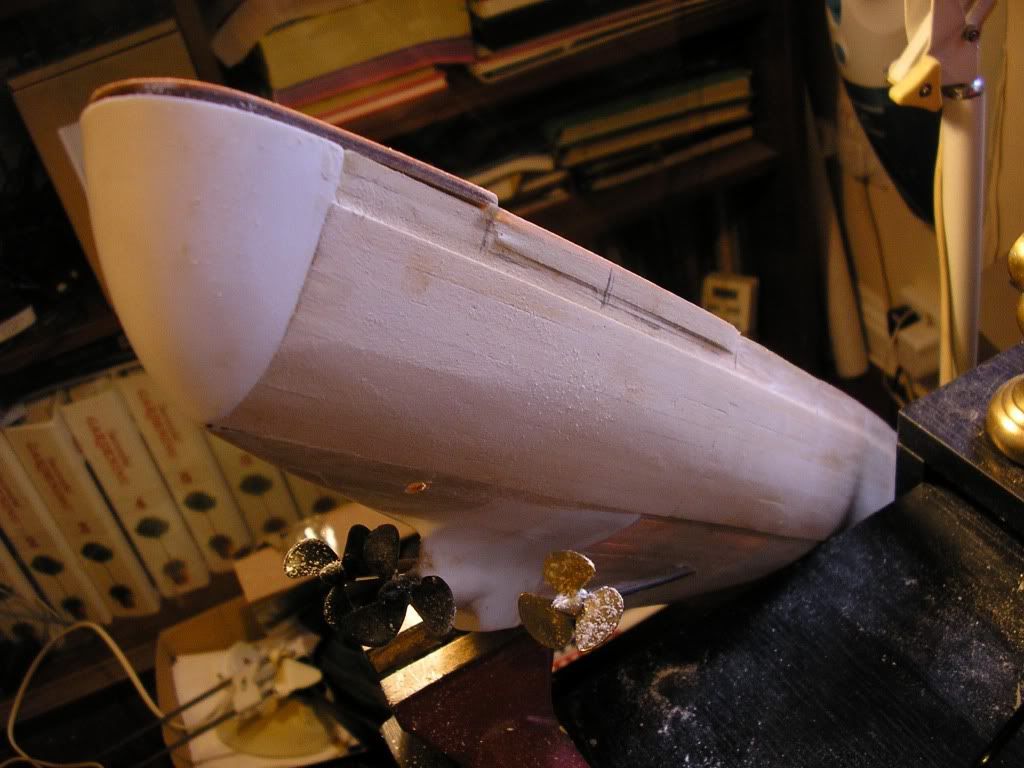 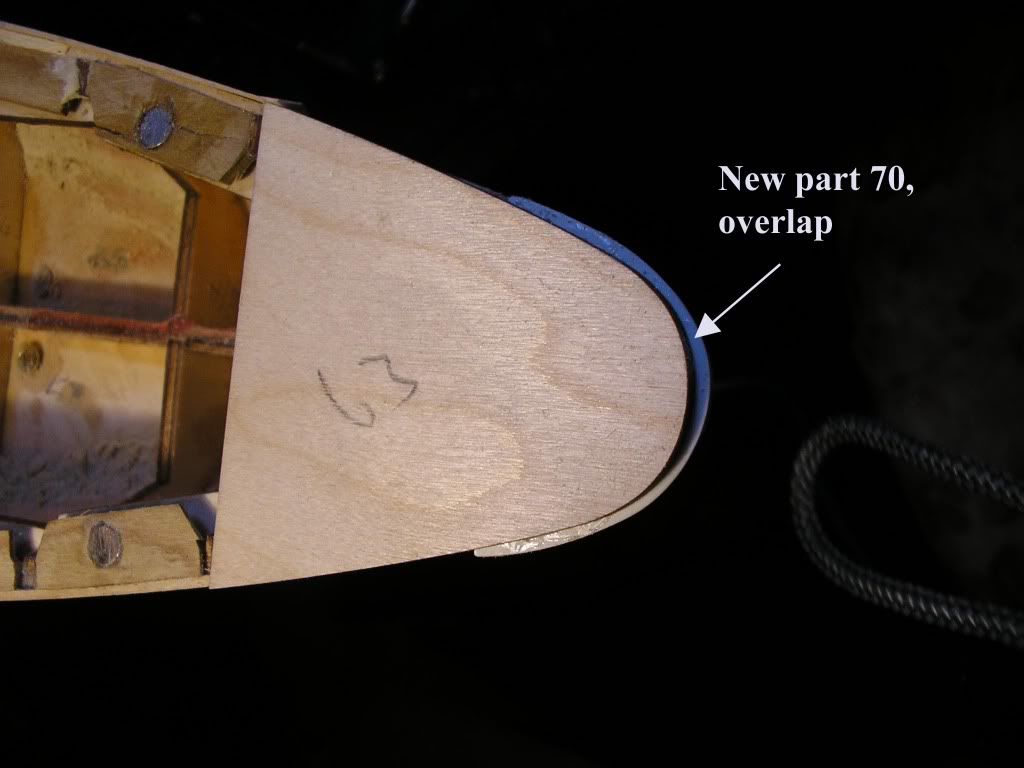 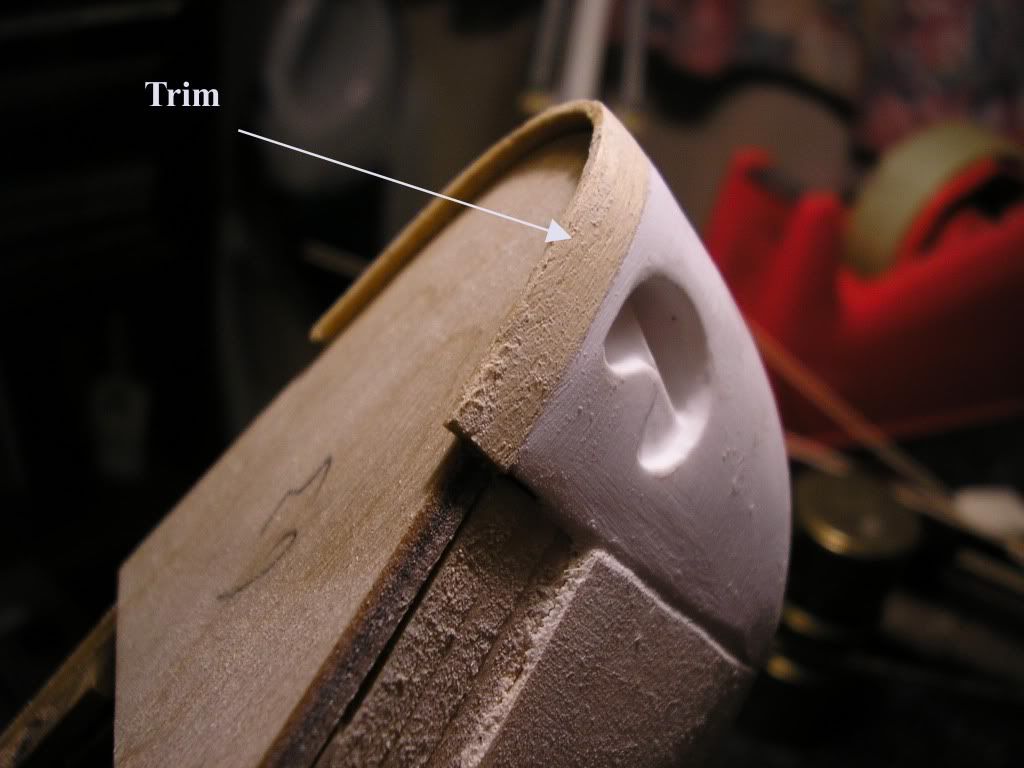 |
|
|
|
Post by swanrail on Nov 13, 2007 22:06:15 GMT 1
Thanks Eric,
one word of caution with the long planks - if you use Evostik weatherproof glue (as I did), note that the glue sets quite quickly.
My second planking used the wood supplied by Hachette, in 300mm lengths, and even here, a couple of my planks, although thoroughly coated with the glue, failed to adhere at the opposite end to that I started to fix into place. It was only a few mm, but enough to cause problems when sanding. Speed and accuracy is of the essence!!!
nil desperandum!
|
|
|
|
Post by russ on Nov 13, 2007 23:08:28 GMT 1
swanrail are you going to taper the part down so as it slopes gentely to the decking or will something come up to equal out the height later on
|
|
|
|
Post by swanrail on Nov 13, 2007 23:56:23 GMT 1
Hi Russ, in a few weeks time, we are due to get a piece of ply containing portholes which glues just forward of the piece that I have added. This will make the new side addition level with the ships hull, until it slopes inwards for the recess above the armour plating.
At the top, I can then either sand down my additional bit level with the deck, or, more likely, leave it proud so that I can add my own version of the decking, and then sand it level with that. So for the time being, will leave well alone.
More haste, less speed, and more chance of a disaster!!!!
|
|
|
|
Post by russ on Nov 14, 2007 0:01:22 GMT 1
thanks for that swanrail i think i will follow in suit then i have had 2 options that was either sand the resin part down to fit or fit the other one but now i have seen pics and had a description of how it will look i will do your idea looks a lot neater thanks have some karma
P.S Thought of this in my sleep last night how did you bend the wood so far round and what type is it looks like one of the 1st plankin or second
|
|
|
|
Post by SB on Nov 15, 2007 9:06:27 GMT 1
A nice compromise Swanrail & good thought, but could it be that 70A is oversize because it has been supplied wrongly sized  It appears Amati have made the change to the anchor pocket and also added 2mm overall in size to account for the non placement of ply part 66, but by doing this they have not realised an overall increase in 2mm also adds 2mm to the part in width hence the overlap if that makes sense. The original part 70 fits perfectly in conjunction with ply part 66 though the anchor pocket on 70 is slightly inaccurate hence why they decided to include a replacement it being 70A . By adding a trim to 70A hide's the overlap but it then makes this part of the stern inaccurate as it adds width where it should not be. I'am sticking with parts 70 & 66 because there is nothing sort out and can live with the slight inaccuracy of the anchor pocket, you will still have an inaccuracy if you add a trim to take up the overlap of 70A. What you cant do is sand 70A to remove the overlap as this will remove depth from the anchor pocket  |
|
|
|
Post by chris on Nov 15, 2007 10:29:04 GMT 1
like i said earlier i've attached my part 70 but filed down stern to fit wreaked planking!!!!!!!!!! so be careful!!!!!!!
|
|
|
|
Post by russ on Nov 15, 2007 12:13:03 GMT 1
i was thinkin of sandion part 70 A down but not at the top at the flat back
that seems to be bigger there as soon as u get rid of some of it part 70 A is pulledinwards thus renderin level with the deck
|
|
|
|
Post by swanrail on Nov 15, 2007 18:55:26 GMT 1
I beg to differ SB, my new part 70 fitted exactly in width to the second layer of planking, yours must be faulty!!!
Ref the top filler, see the picture of the stern of Markus model on page 2, reply 20 of the GERMAN R/C GEAR thread, on the original part 70, he has fitted two planks at the top of part 70 to line up with the recess filled porthole plank forward of the stern resin. (this part we shall not be getting for a while). Looking at my picture above, you can see the recess, which carries on down the hull, but the last 6 inches or so will be filled with this porthole plank and butt up level with my rounded addition, so as to bring a nice smooth profile to the deck as seen from above. The removable deck will then fit flush to this without being sanded down in width.
To achieve the filler part, I simply took a gash piece of 5mm by 1.5mm plank, held it over the open top of my electric kettle until it was thoroughly wet with steam and then carefully bent it around to about 200 degress. When cool, it sprang back to about the correct 180 degrees, but I did hold it in place around the stern while still damp, with my fingers. A touch of superglue and that was it! All I had to do then was a sanding down of the wood to flush fit against the resin part. The top part, as can be seen, overlaps the deck by about 2mm or so. Hopefully, I can plank inside this later on and then sand down so that the whole deck part is only 1mm deep.
|
|
|
|
Post by swanrail on Nov 15, 2007 19:05:39 GMT 1
p.s. in my top picture of this thread, you will see the side recess going forward from the resin part, but also note the section sticking out a bit with a black vertical line on it. This is because when I fitted the removable stern deck, I found it overlapped the hull aft of the kinked edge, and wrongly filled it in to bring level all the way along!! (on the other side, I realised this was wrong having seen the preview pages (thank god for them!!!!) and so left the planking as it should have been, ready for the new part with the portholes - can also be seen on the preview page, I think about issue 45 or so). As I have mentioned elsewhere, the model sadly lacks decent drawings so at least we can see where we are going - Hachette are probably logical in their approach - but.... ? |
|
|
|
Post by markus on Nov 15, 2007 19:44:34 GMT 1
Ref the top filler, see the picture of the stern of Markus model on page 2, reply 20 of the GERMAN R/C GEAR thread, on the original part 70, he has fitted two planks at the top of part 70 to line up with the recess filled porthole plank forward of the stern resin... must admit it almost looks like 2 planks above part 70, but it's only 1 plank 8mm wide/2mm thick  cheers markus |
|
|
|
Post by popeye on Nov 16, 2007 14:53:13 GMT 1
Gluing the long planks - I also use the evostick external glue and a flat, chisel end, nylon 1/8 inch brush, which allows the strips to be glued on the full width with 1 brush stroke. It takes me about a minute to apply the glue along the length and the glue remains sufficiently "tacky" to fit the plank in place along its length and then apply my clamps to hold everything in place while it sets fully. The only problem I have is when the phone rings halfway through the process!!! The lesson is that once you start you must work to completion without any distractions and have everything you need immediately to hand.
|
|
|
|
Post by Achtung!! on Nov 20, 2007 8:52:09 GMT 1
Ok - finely on issue 35, now sorry if I am covering old ground, but should I attach part number 70 on before or after i put the second layer of planks on?
|
|
|
|
Post by markus on Nov 20, 2007 17:33:35 GMT 1
Ok - finely on issue 35, now sorry if I am covering old ground, but should I attach part number 70 on before or after i put the second layer of planks on? after.... markus |
|
|
|
Post by eric on Nov 29, 2007 15:33:20 GMT 1
fitted part 70 yesterday, and found it was identical to Dons, so I have also put the 1mm srip round the stern as a filler. Looks very good.
I did my second planking FIRST, then glued on the resin piece.
I glued on part D the day before and after a bit of sanding down, is also looking good.
|
|