|
|
Post by tjilpi on Feb 25, 2008 1:40:58 GMT 1
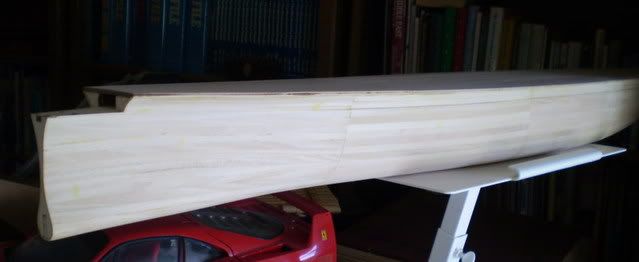
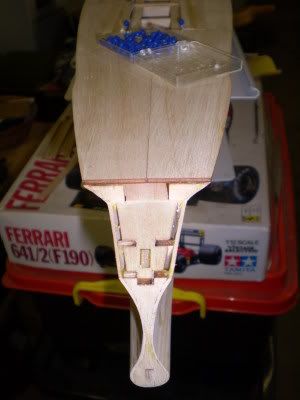
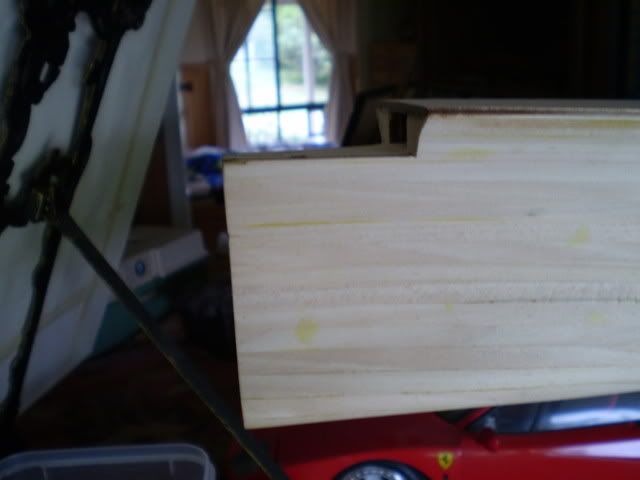
Can anyone post an exact and definitive view of the planking at the top of the bow for me. Everytime I think I understand it, it changes. Right now I've got the plank just passing through the junction of that bow plate (part #35) with frame #31 and then I've sanded the 1st plank back level with the part #35.
Cheers
Oz
|
|
|
|
Post by tjilpi on Feb 25, 2008 2:16:32 GMT 1
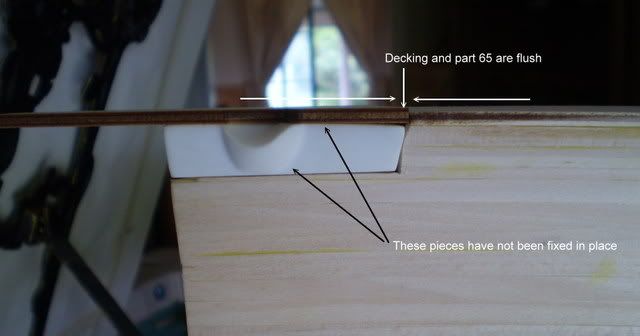
my latest incarnation/understanding implies that the top edge of the first plank is parallel to, and in fact flush with the entire length of part #35? and not rising from below and crossing at frame #31?
|
|
|
|
Post by Baz on Feb 25, 2008 11:32:50 GMT 1
Hi bigt aka Oz You're from the apple isle by chance  ? (big......T) Are you talking about the first layer of planking ? If so, check out the photos of Marks build from the main page - 'The model' for issue 22. I think you have answered your own question in your next posting. My interpretation is the planking needs to be sanded parallel (and flush) with all of part #35. On this sits resin anchor piece part 67 I've added some pics of my model Hope this helps without me verbalising ad infinitum     Baz |
|
|
|
Post by Mark on Feb 25, 2008 23:49:36 GMT 1
Is that a large Tamiya F1 Ferrari lurking in the picture ? It would make a nice feature in the other models section  |
|
|
|
Post by tjilpi on Feb 26, 2008 1:44:06 GMT 1
Thanks Baz, Down near Geelong, no neck scar, no parents related before marriage  It was the first layer I was talking about, and mine looks 'similar but not quite'. I don't think I need to strip it, just to be a bit more artful with the 1.5 x 3's. I'm hoping the second layer will cover it. Congratulations on a good looking model by the way. Cheers Oz |
|
|
|
Post by Baz on Feb 26, 2008 12:07:18 GMT 1
Is that a large Tamiya F1 Ferrari lurking in the picture ? It would make a nice feature in the other models section  Aaaargh..........you beady eyed fella. Sorry Mark, that is a 1/8th scale (Pocher) Ferrari F40 in the lounge. Metal body....weighs a ton My prized 1/12th scale Tamiya F1 641 sits in the garage with me (gathering dust) A coupla piccies........no worries. Will post something this weekend Baz |
|
|
|
Post by Baz on Feb 26, 2008 12:16:50 GMT 1
Thanks Baz, Down near Geelong, no neck scar, no parents related before marriage  It was the first layer I was talking about, and mine looks 'similar but not quite'. I don't think I need to strip it, just to be a bit more artful with the 1.5 x 3's. I'm hoping the second layer will cover it. Congratulations on a good looking model by the way. Cheers Oz Goodo Oz You'll be OK then. Thanks for the thumbs up . I'm on the other side of the bay and up in the hills. Baz |
|
|
|
Post by metallisam on Feb 27, 2008 10:54:05 GMT 1
Just a quick question, don't know if it has been asked before, in the instructions it says to taper a plank from the end of the stern resin peice but i noticed from some other models on here that a lot of you guys have not done this. Which one is correct?
|
|
|
|
Post by swanrail on Feb 27, 2008 13:44:57 GMT 1
In my case, I set the stern resin part D down by about 1mm as per Markus advice. This has allowed all the second planking to butt up against it, including the keel plank. With the Hachette version, all the second planks need to be faired down where they meet the resin part, and the keel plank goes over the resin part. You pays your money and you take your choice!!!
My advice to those early in the buiuld is to have a good read of all our suggestions then make you mind up before you start gluiing on bits - a change earlier can save a lot of heartache and problems later!!!!!!
|
|
|
|
Post by rem2007 on Mar 9, 2008 13:10:12 GMT 1
Carrying on with this discussion of 2nd layer planking, the destructions say to feather in this keel plank and I've attached this resin piece to allow for 1mm all around so I'll be going the way you went Don. As I've paid my money. The only benefit I see of feathering these planks to th resin piece is for cosmetics and further adhesion, however at the end of the day what with glue, filler and several layers of paint, its between you, me and the gate post .
Robert
|
|
Deleted
Deleted Member
Posts: 0
|
Post by Deleted on Apr 21, 2008 9:30:55 GMT 1
I totally agree. Thinking about how to lower resin past D by 1mm ??
|
|
|
|
Post by swanrail on Apr 21, 2008 22:10:27 GMT 1
Hi Skyfire,
my resin part D was lowered very easily - I used 1mm thick side planks (2nd layer ones) down each side of the flat part of the wood, and filled in the middle with wood filler to make a flat bed for the part D (I filled in just to ensure that water could not get in when afloat, belt and braces really).
With part D lowered, the 2nd layer planks fitted flush along the sides, and the keel 2nd layer plank butted up against the resin, did not go over the top as the Hachette version does, much better!!!!
|
|
Deleted
Deleted Member
Posts: 0
|
Post by Deleted on Apr 22, 2008 11:54:54 GMT 1
Ahh ok, sounds like a good idea, Think I'll do the same.  |
|
|
|
Post by welshtrooper on Apr 23, 2010 20:31:42 GMT 1
Ive noticed the red hull clamps that are being used, are these in with the kit or do you have to purchase them elsewhere. If they are purcheased elsewhere, where can I get them from?
|
|
|
|
Post by gordon on Apr 24, 2010 19:14:30 GMT 1
|
|