|
|
Post by markus on Oct 25, 2007 9:14:40 GMT 1
Markus, With the veneer, are the planks etched into it or just printed on? What issue did it come with please? Thanks very much Napoleon iss 60, unfortunately not etched....  markus |
|
|
|
Post by david on Oct 25, 2007 10:04:43 GMT 1
Markus, Here's a picture that you posted some time ago of the Amati model. To me it appears to show that the deck planks are etched, not printed! 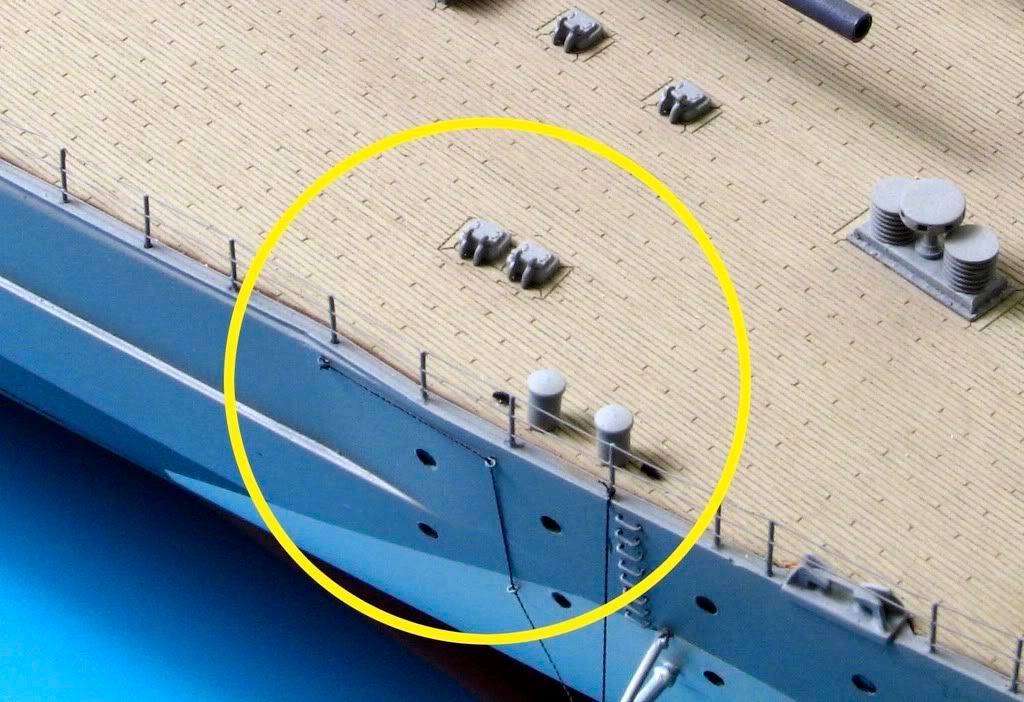 Am I misreading this picture? Personally, I think that the printed deck looks rather disappointing.  David |
|
|
|
Post by markus on Oct 25, 2007 16:25:43 GMT 1
maybe printing them was cheaper than etching  you're right, they don't look as good as in the preview pics i think they will look good after one coat of glattfix... markus |
|
|
|
Post by napoleon on Oct 25, 2007 21:10:57 GMT 1
It seems a bit of a shame if we are only going to get a printed deck overlay. May well have to consider another way of doing things (obviously not going to be easy at such fine detail)
|
|
|
|
Post by david on Oct 25, 2007 21:58:22 GMT 1
Napoleon,
For fear of being considered a subversive and worryingly complete 'deck fetishist', I held off in my last post, suggesting that there had to be a better way than using out-of-scale, no-relief decking. So I'm glad you said it first! I think you are right there has to be 'another way'. If Amati are going to the considerable trouble of providing us with stunningly good PE brass fittings, almost down to the dust on the rivets, it seems to me puzzling that the deck has received comparatively little attention, particularly since it represents a good quarter of the Bismarck's surface area. 'Spoiling the ship for a ha'peth of tar', comes to mind.
I'm going to have a go at developing an alternative, and hope that you will too, but it would also be good to hear from the experienced modellers amongst us.
David
|
|
|
|
Post by napoleon on Oct 25, 2007 22:41:42 GMT 1
Thanks David,
I'm no expert (this is my first wood build) but with a nice sharp blade, it should be possible to manufacture 'proper' planks. Will let you know of my progress.
Napoleon
|
|
|
|
Post by Mark on Oct 26, 2007 0:06:04 GMT 1
Dead easy. Take some teak veneer, a steel rule, LOTS of sharp knife blades, and start cutting 1mm strips. It would be worth making a jig of some sort to help you cut the strips consistently. To simulated the caulking, colour some paper black and insert strips edge on between the planks. It's gonna take a lot of time and patience to do tho - more than I've got |
|
|
|
Post by Mark on Oct 26, 2007 0:06:43 GMT 1
PS - 1mm planks equate to a plank approx 8" wide
|
|
|
|
Post by Mike B on Oct 26, 2007 17:25:07 GMT 1
Dead easy. Take some teak veneer, a steel rule, LOTS of sharp knife blades, and start cutting 1mm strips. To simulated the caulking, colour some paper black and insert strips edge on between the planks. Mark, A steel rule tends to slip on the veneer, especially when the grain tries to divert the knife blade. Try using the back of a hacksaw blade (especially the wide ones). The teeth will grip into the veneer and stop it moving. I simulate caulking on my wooden ships by running a HB pencil lead along one edge of the deck plank before gluing it down. It doesn't look much but when sanded and matt varnished, a distinct thin line is noticeable. Mike B |
|
|
|
Post by david on Oct 26, 2007 17:53:31 GMT 1
Mark and Mike thanks, terrific suggestions both! I'm definitely going to take this route - I just hope life is long enough!
David
|
|
|
|
Post by swanrail on Oct 26, 2007 22:49:04 GMT 1
If the planking is 1mm thick there are two other alternatives:
1. I have used my minicraft sawbench together with a jig to cut down 5mm planks to narrower widths. Easy to do and no chance of the grain pulling the cut, which often happened when I tried the steel rule method. (the jig is necessary to keep the thin plank straight when entering and leaving the sawblade)
2. take 1mm thick planks and glue them down edge on, finally heavily sanding them down to the required deck thickness.
In the case of my Victory, which used version 1 above, I also painted one side of the plank with black acrylic paint, which gives very lifelike caulking.
Version 2 I successfully used on a clipper ship many moons ago in my early days. (and easier to paint the sides)
|
|
|
|
Post by napoleon on Oct 26, 2007 23:18:40 GMT 1
Hi Don, You have just save me a lot of anguish and experimentation. I am going to try out your Version 2 which is the best idea to date. Cheers matey.  I will also be putting the matter to Hachette to see what they say regarding what can only be a change of heart for some reason (probably costs?) Only problem I can see would be for going round the turrets |
|
|
|
Post by swanrail on Oct 27, 2007 0:30:07 GMT 1
No problem, Napoleon. When I built my Jotika Granado, the decks were supposed to be laid straight, whereas they should feed into side planks which are cut to follow the hull shape. These planks, or waterways, can be seen in my first photo:  They are cut with a fretsaw to follow the hull shape (or around deck houses, guns, etc) and should be about twice the width of a normal plank. Picture two shows the planks being cut into this waterway, note that my waterways were initially cut well over size so that, using marquetry techniques, the planking can be cut into them. 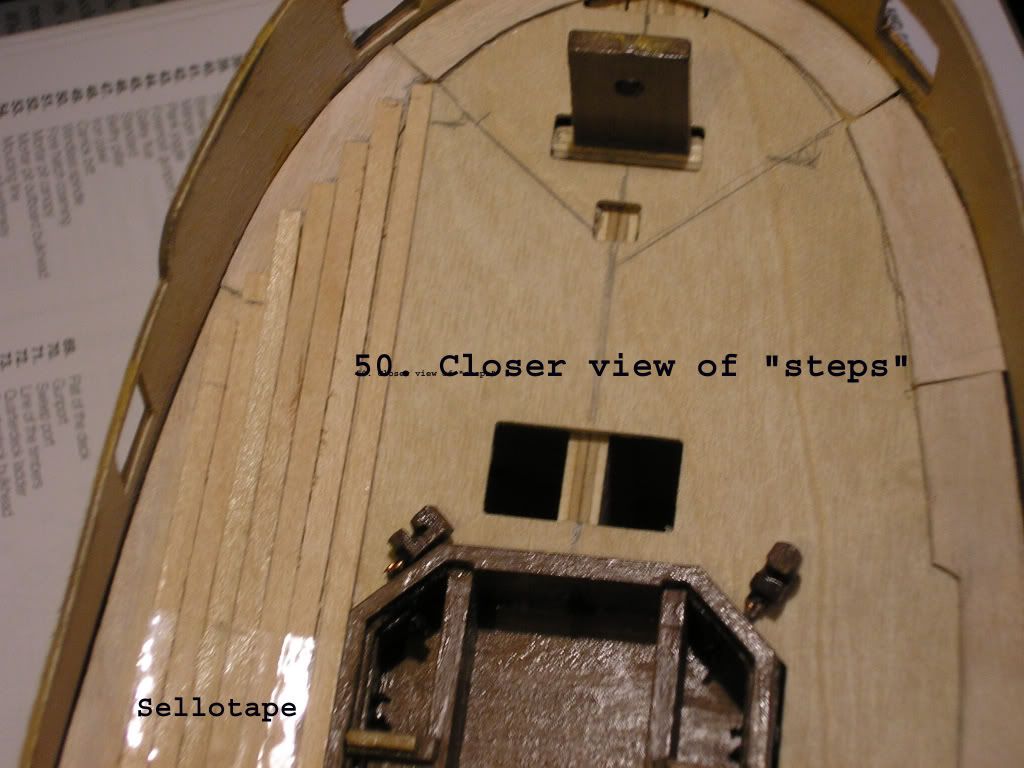 and: 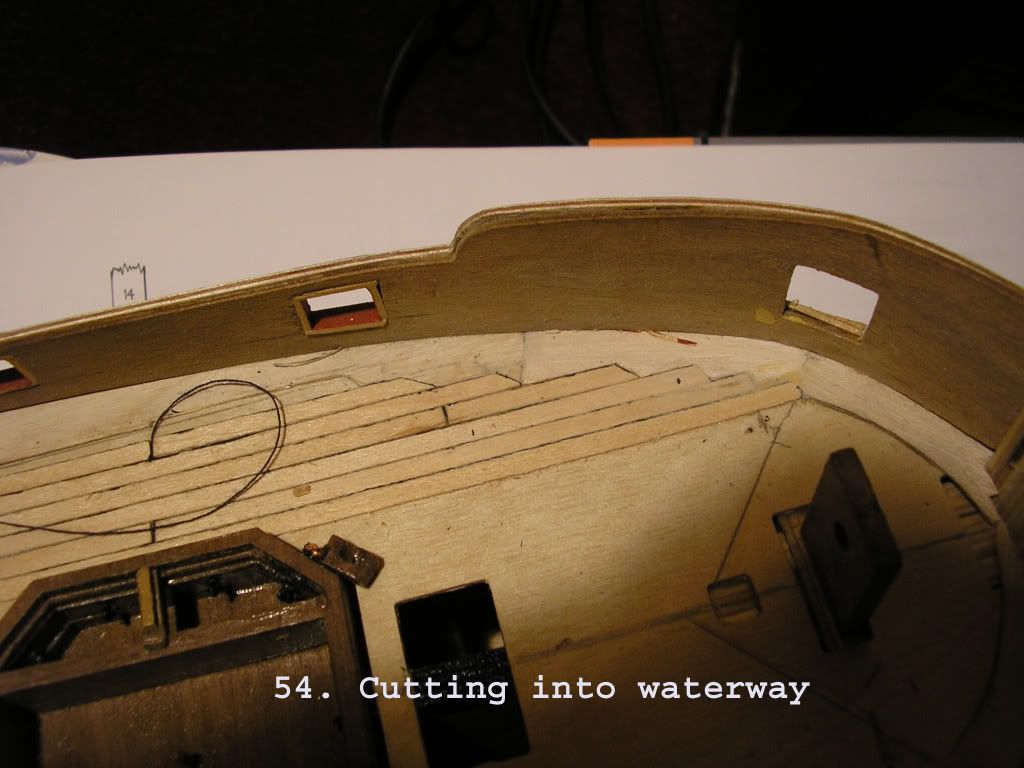 the finished deck:  Obviously, at the scale we are building at, this work would be quite demanding, but not impossible, and I shall probably take that path. One thing that worries me, seeing Markus picture of the deck in place, is that the superstructure still has not been primed or painted. In my case, this would probably lead to paint getting onto the deck, even with very careful masking. Seems better to me to do all the painting before fitting the decks, this being almost the last job. Be interesting to hear Markus comments on this. |
|
|
|
Post by Mark on Oct 27, 2007 3:12:18 GMT 1
On my Titanic, which had a pretty good simulation of a planked deck, all the bulkheads were painted before gluing them on to the deck houses. I will be painting deck houses before attaching them.
|
|
|
|
Post by markus on Oct 27, 2007 10:11:34 GMT 1
One thing that worries me, seeing Markus picture of the deck in place, is that the superstructure still has not been primed or painted. In my case, this would probably lead to paint getting onto the deck, even with very careful masking. Seems better to me to do all the painting before fitting the decks, this being almost the last job. Be interesting to hear Markus comments on this. don't worry, my deck isn't glued onto the superstructure by now. think i will do it this way: 1. painting the superstructure after all etched parts are mounted 2. painting the deck with one coat of glattfix 3. gluing the deck in place 4. painting the whole superstucture with clear paint cheers markus |
|