|
|
Post by Mike B on Apr 18, 2008 16:53:21 GMT 1
Laminating framesLet me start by saying that an Optivisor is a godsend for accurate cutting of the card frames. Because of the exorbitant cost of spray adhesive, I decided to use a gluestick to stick the scanned copies of the frames to the card. I then roughly cut out the frames (A) and then trimmed them about 5mm oversize all round (B). This enabled the card to be cut much easier as there was less sideways pressure against the craft knife. I used the craft knife to cut the straight sides (C) using an aluminium straight edge as a guide and the curved sides of the frames (D) were cut freehand, all with the assistance of the optivisor. 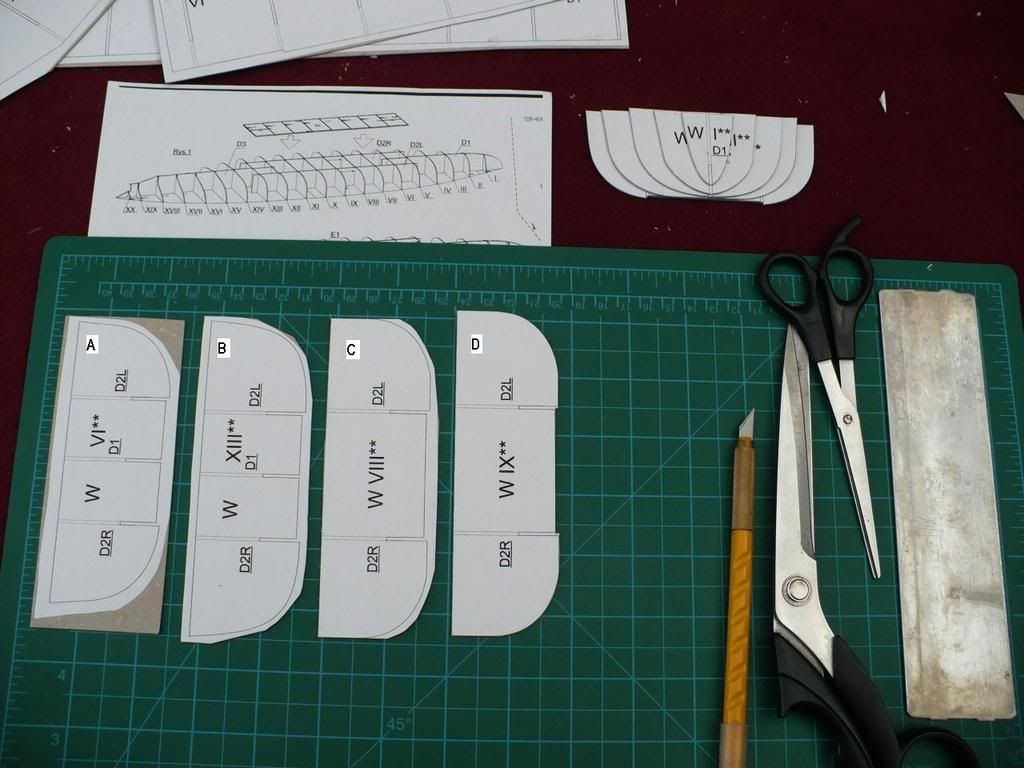 Once the framework is complete, I intend spraying it with an aerosol grey primer to seal the card, so another advantage of the glue stick is that the templates can be peeled off the card very easily. After cutting out the frames, the slots were cut in them (1). Then, the dotted lines were slightly scored and the strip of paper removed (2). The card was then coloured with a highlighter to show the frame position (3) and then the rest of the paper template was removed, not forgetting to transfer the part No’s onto the card (4). 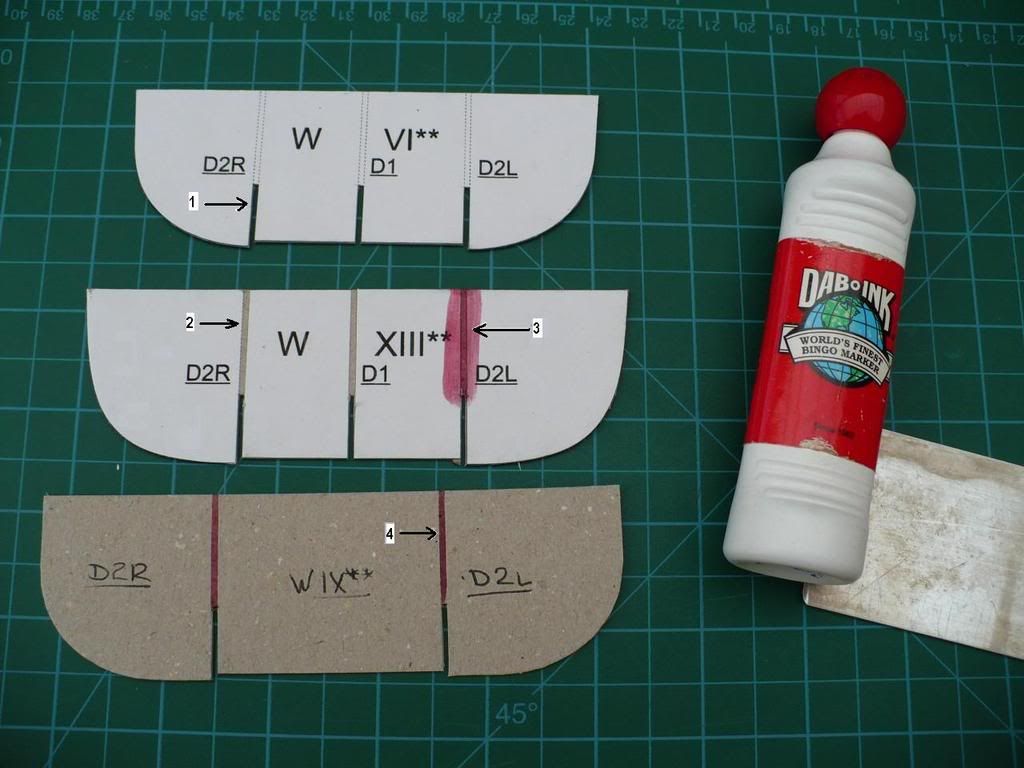
|
|
|
|
Post by jim on Apr 18, 2008 18:28:13 GMT 1
What glue do you intend using? I am building a card Repulse 300 scale and have actually postponed the build because I am very displeased with the glues I have tried. Have tried pva, uhu, bostik (all purpose) but they are just too messy. can you recommend one?
|
|
|
|
Post by Mike B on Apr 18, 2008 20:04:01 GMT 1
What glue do you intend using? I am building a card Repulse 300 scale and have actually postponed the build because I am very displeased with the glues I have tried. Have tried pva, uhu, bostik (all purpose) but they are just too messy. can you recommend one? Hi Jim, this is my first card model. I use GENKEM (formally Bostik) quickset PVA for all my wooden boats, decanted into a small plastic bottle with long thin nozzle. This allows a thin bead of glue to be used. My friend uses PONAL Express which is similar but a bit more expensive. These PVA's grab after about 30 seconds and are great for planking (I can plank 1 plank either side per hour). I intend using this also for the card, as well as CA glue. Where the bow section of the keel had to be chamfered, I sanded the card both sides and then smeared the PVA on with my finger and let it dry. It dried great and was tuned up with a touch of sandpaper again (it was like a knife). hope this helps. Mike |
|
|
|
Post by poulw on Apr 18, 2008 22:38:33 GMT 1
I contacted Thomas Pleiner in Germany (manufacturer of cardmodel accessories like ladders, stairs, etc.) and asked for his recommendation of which glue to use. He discouraged the use of CA unless you seal the card first, eg if you saturate it with CA glue and let it dry the card becomes like plastic. Otherwise his recommendation was to use white glue (like PVA) or epoxy glue, so that's what I am using now and both work great. However, I intend to try the CA trick on the railings I bought from him - he actually made four railing boards to my specs without any extra costs (1.35m total 2-wire straight railing per board each EUR7.00 plus airmail cost of EUR4.00 for all four boards). BTW his webshop is www.mtp-studio.de/oscommerce/catalog/index.php?manufacturers_id=8The site has been under reconstruction for some time now, but should reopen soon. In the meantime he is contactable via email. |
|
|
|
Post by nemesis on Apr 19, 2008 10:41:47 GMT 1
Looks like you're really getting into this card kit malarkey, Mike. I'd love to see the look on yer dad's face when you present it to him.
|
|
|
|
Post by Mike B on Apr 19, 2008 14:30:29 GMT 1
|
|
|
|
Post by Mike B on Apr 19, 2008 20:57:26 GMT 1
Lower hullTip:- a piece of glass is great when a flat surface is required for gluing the hull elements. To make it easier to glue the lower hull elements, I cut some tongue depressors into 2mm strips for rib guides. 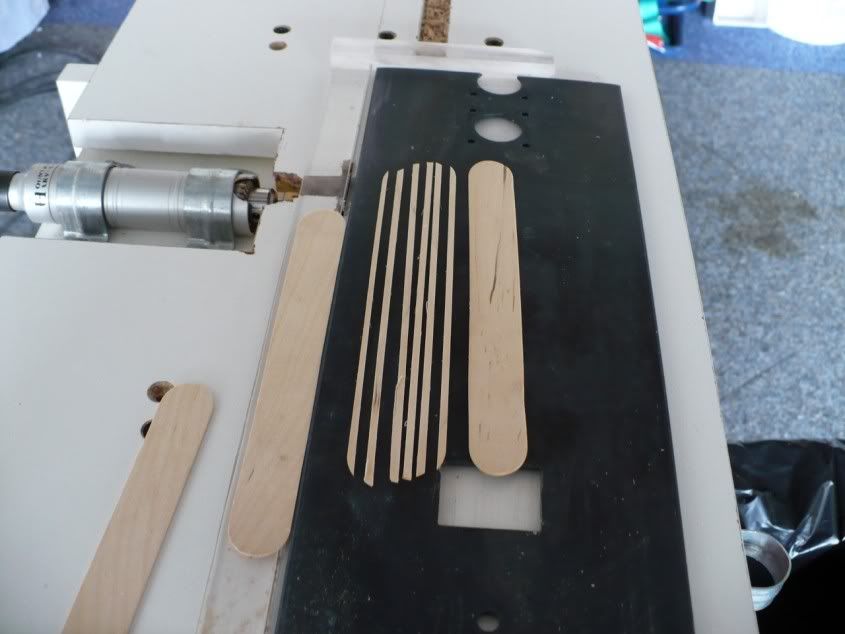 I then cut them to size and glued them onto the lower hull template card. 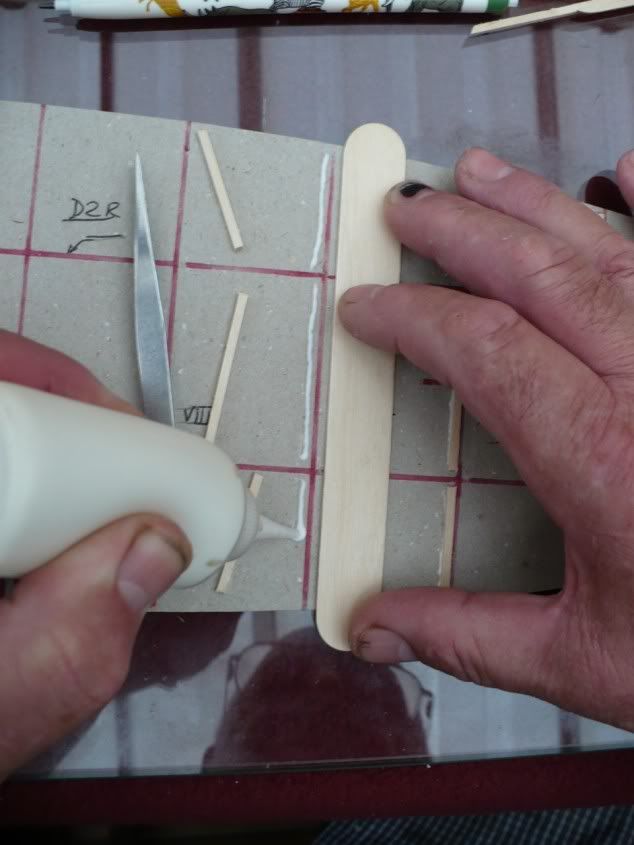 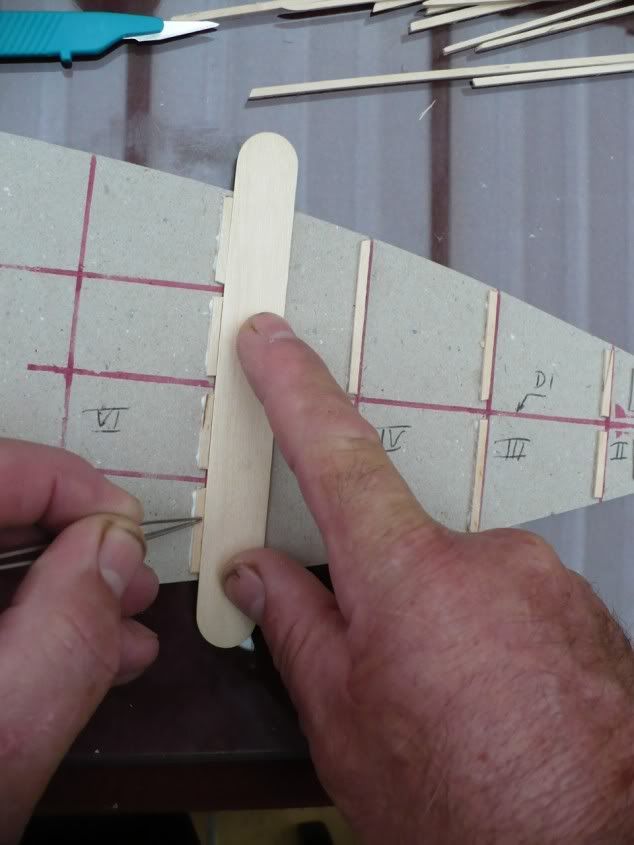 This will make it easier and simpler to assemble the framework. 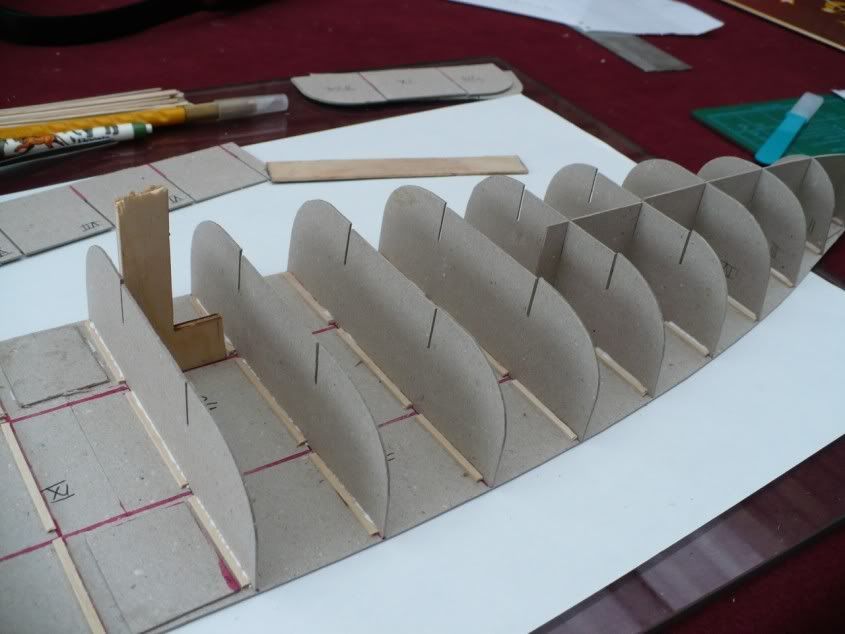 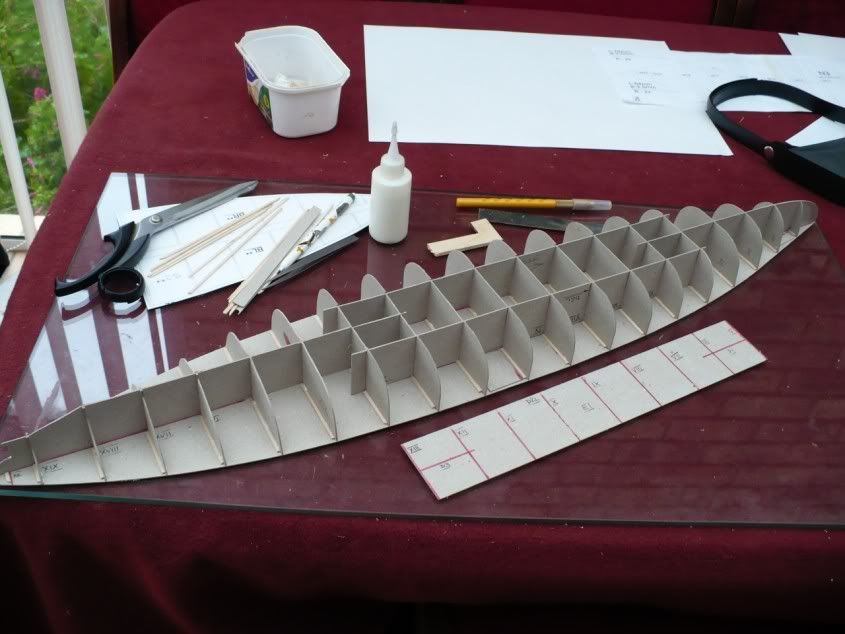 Here is the completed lower hull.
|
|
|
|
Post by afkmatrix on Apr 19, 2008 21:40:27 GMT 1
That looks very neat Mike congrats. Would you say building this model is best for someone experienced with card models? Also I don't suppose you know the weight of that card as it looks perfect for the model tank I am trying to do.
|
|
|
|
Post by Mike B on Apr 19, 2008 21:46:46 GMT 1
That looks very neat Mike congrats. Would you say building this model is best for someone experienced with card models? Also I don't suppose you know the weight of that card as it looks perfect for the model tank I am trying to do. Never built a card model before, special reason for building this one. The instructions say it is aimed at the moderate to advanced modeller!  The card is 1.2mm, don't use g/m² in the craft shop!  |
|
|
|
Post by afkmatrix on Apr 19, 2008 21:53:54 GMT 1
Thanks for that Mike, Yeah saw your reason for building it. Just asking as they have a Yamato one at 1/200 there which is very tempting indeed. Does it come with all the guns and fittings etc?
|
|
|
|
Post by alanv on Apr 19, 2008 22:09:21 GMT 1
Hi AFK. I've got the Yamato card kit, very impressive it is to. But I'm stuggling to find a supply of the right card stock.
|
|
|
|
Post by afkmatrix on Apr 19, 2008 22:11:33 GMT 1
Thats good to know alanv. I will have a hunt on Monday in a local shop that might have something, will let you know.
|
|
|
|
Post by nm on Apr 19, 2008 23:05:04 GMT 1
Or try moduni.de for Yamato guns.
NM
|
|
|
|
Post by Mike B on Apr 20, 2008 16:27:35 GMT 1
Thanks for that Mike, Yeah saw your reason for building it. Just asking as they have a Yamato one at 1/200 there which is very tempting indeed. Does it come with all the guns and fittings etc? The instructions say use 0.8 - 1mm card but that thickness is not available so I used 1.2mm. Where necessary, allowances will be made for the extra thickness. The turrets and gun barrels are printed card but you could make new barrels out of turned dowels. Here is a link to the Courbet's sister ship, the Paris, to give you an idea of a finished model. forum.zealot.com/t156944/ |
|
|
|
Post by Mike B on Apr 22, 2008 8:00:57 GMT 1
Upper hull frameworkThe upper hull framework will be completed using the same method but instead of assembling the framework on the supplied paper template, I will transfer the frame positions of the upper hull paper template to the upper side of the card of the lower hull and glue 2mm alignment strips as before. 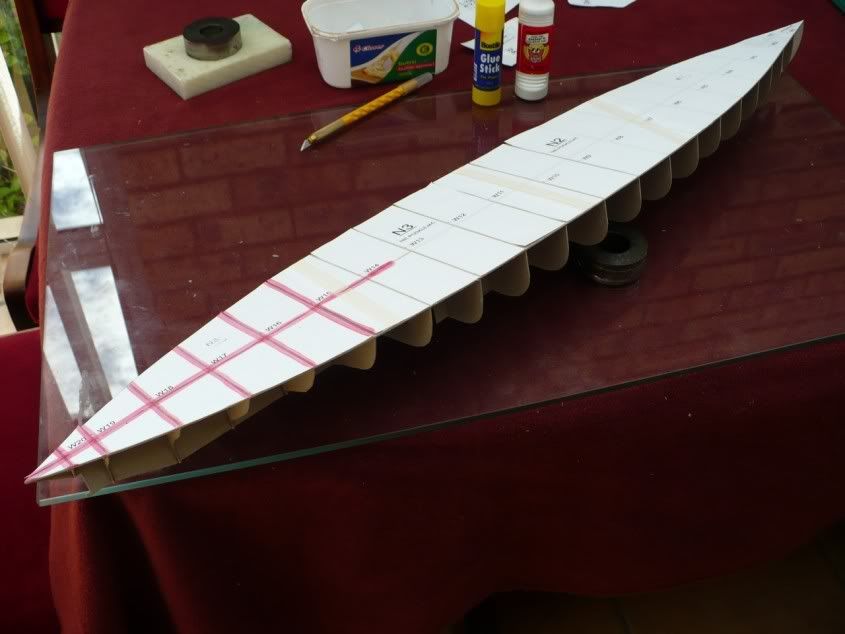  The frames were lightly glued in place so that they would dry quickly. When it was dry, I then ran a fillet of glue all around the frames and left them to dry fully. The next day I glued the side strips onto the hull framework. Here is the completed hull with the side strips in place. 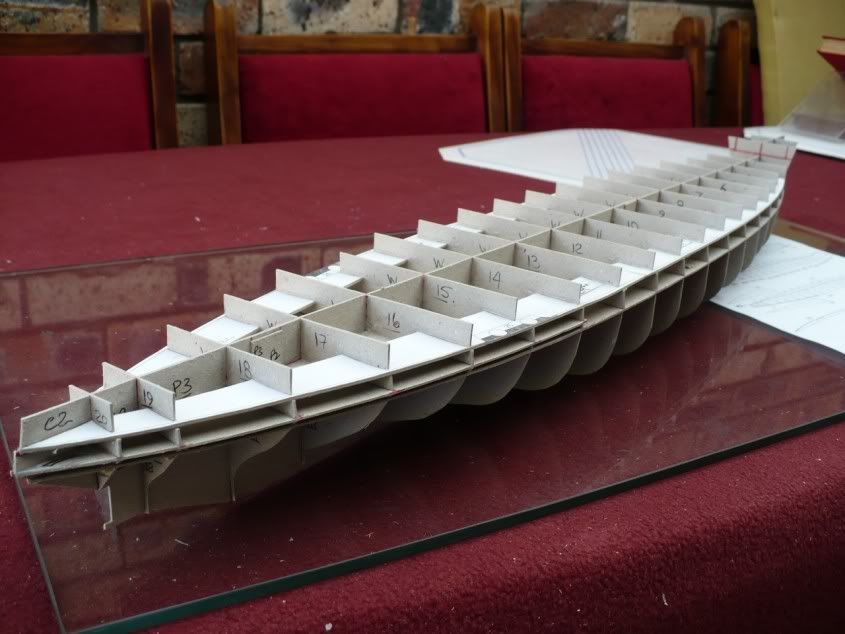
|
|