|
|
Post by Mark on Dec 28, 2008 22:30:03 GMT 1
Ohhh, that's nice  |
|
Deleted
Deleted Member
Posts: 0
|
Post by Deleted on Dec 29, 2008 1:22:41 GMT 1
Looking good Robert. |
|
|
|
Post by snapdragon on Dec 29, 2008 11:59:17 GMT 1
I had no problem at all putting the hull together. I even glued it too as there was a slight gap at the bow. I'd like to know how Marcus would put the R/C stuff in too. It intrigues me!
When it comes to the Torpedo Tubes my advice is to put the eched band round the forward end before putting it in the hull. you'll find it easter. Also be aware that there is a definate left and right tube. Do one at a time and and fit it before doing the other. The topedo doors are moveable.
I have another one of these still in it's box and I would advise you to paint the hull now before you do anything else. I'm going to paint the hull on the second S-Boat before I put it together!
James
|
|
|
|
Post by markus on Dec 29, 2008 19:07:02 GMT 1
I'd like to know how Marcus would put the R/C stuff in too. It intrigues me! James just send me your hull and you'll get it back with some motors in it  seriously, i cannot see why this particular model should cause major problems in rc conversion... markus |
|
|
|
Post by markus on Dec 29, 2008 19:11:51 GMT 1
...I would advise you to paint the hull now before you do anything else. I'm going to paint the hull on the second S-Boat before I put it together! James but be careful not to paint the 'gluing areas' - plastic glue doesn't work on paint..  markus |
|
|
|
Post by snapdragon on Dec 30, 2008 16:20:20 GMT 1
Thanks for the offer, Markus. Unfortunatly my modeling budget is zero since I was made redundant. I may take you up on the offer in the future once I'm back in work. Mever done R/C before!
|
|
|
|
Post by markus on Dec 30, 2008 17:53:58 GMT 1
hope you'll find a new job soon so you can spend your money for important things like modelmaking markus |
|
|
|
Post by Robert on Jan 2, 2009 18:34:27 GMT 1
Thanks guys. And really sorry to hear about your working situation, James.
As a free-lance graphic artist, I am feeling myself the effects of recession and can predict, thru my 1:35 scale binoculars a tough year coming in from the horizon.
My very best wishes to you for finding at the soonest another and even better job than the one you had...
All my very best and good luck to you.
Robert
|
|
|
|
Post by Robert on Jan 6, 2009 16:43:39 GMT 1
Hi everybody, Did some more little work on the kit during my spare time and I can tell you it was a hell of a wise idea blunting the screws, boys! Even so, the one fixing the bow still was too long and needed a further shortening. Not before it left me with a little bump on its opposite side...  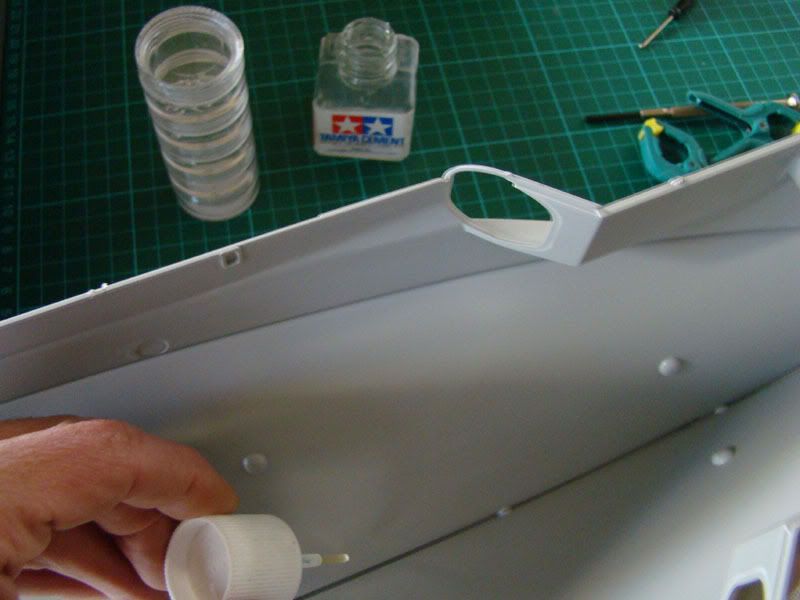 Back to the hull, I glued the two halves together, using mainly Tamiya Cement and Tamiya Extra Thin Cement on both bow and stern where the brush has no access. Except for the part that concerns the bow that had to be held firmly by hand to join both sections (clamps have no grip there), there was no major problem encountered. Afterward, the keel required quite some sanding and a finish with a Scotch Brite sponge to look just perfect... 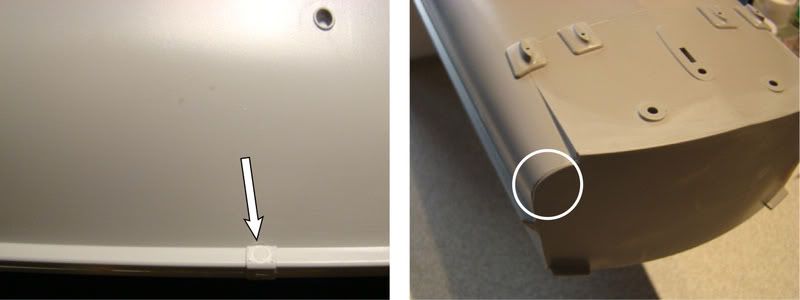 The small circular blanking covers which shelter the screws do not have such a perfect adjustment and required a tad of putty. Ummm... Also, the junction between the hull and its rear lets appear a light fault, as you can see on the pic. This was eliminated by using my mixture (plastic fragments dissolved in cellulose thinner), but if you are not a follower of this technique, there's still the possibility of using either Tamiya Putty diluted in acetone, or applying several thin coats of "Mr. Surface." Make up your choice for your models, it's all up to you! I might put my baby on hold for the next few days to come, just the time to receive two books ordered thru Amazon, so to get myself better acquainted with her: "German E-boats 1939-45" by Osprey in the New Vanguard series and "Schnellboote in action" by Squadron. In the other hand, I have heard recently that Eduard Model Accessories is working on a photo etched set for her. So... why running?! As we say in Italian: "Chi va piano, va sano e chi va sano, va lontano." Or, in other words: "Who goes slowly, goes surely and who goes surely, goes far." Ciao. |
|
Deleted
Deleted Member
Posts: 0
|
Post by Deleted on Jan 7, 2009 0:44:03 GMT 1
Looking good Robert and I love the quote. |
|
|
|
Post by Robert on Jan 22, 2009 18:44:42 GMT 1
Proceeding by "easy" steps with the build of my "fast" boat... 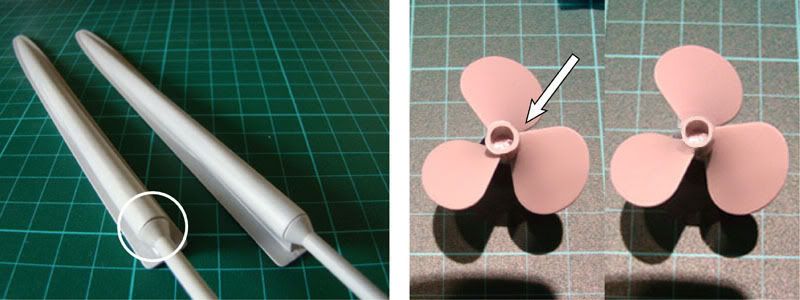 Two slight dilemmas had to be corrected. In the first place, had to adjust both propshafts to the shafts so their diameters would match. Then, coming to the props, how was my surprise to find that the edges of the blades were overly thick and not looking quite circular to me.  But again, with good willing and some considerable thinning before fitting, we can achieve miracles.  Ha... Where would be all the fun doing model kits if they had not these small imperfections that require to be rectified? -- And it's just the beginning.  |
|
|
|
Post by danny on Feb 8, 2009 23:56:13 GMT 1
|
|
|
|
Post by Robert on Feb 15, 2009 11:39:43 GMT 1
Thank you Danny for the link. If only my Dutch could be better, I would be delighted. But I'll keep an eye on it anyway. 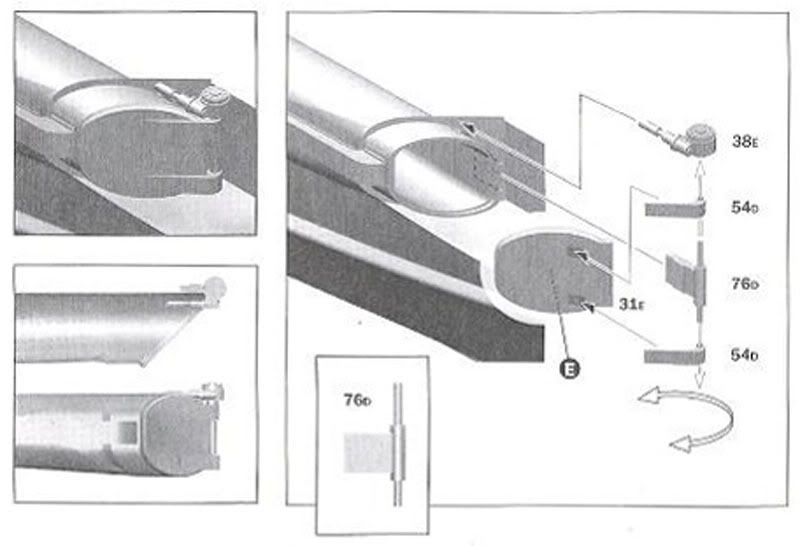 The instructions booklet suggests gluing the torpedo tubes into the hull and to fix next the doors... I would recommend, to make it much easier, to assemble the whole tubes with their doors one first -- pieces #38 exempted -- and when decks and tubes are glued to the hull, to lay a coat of primer. Last step will be fixing pieces #38 on top of doors once the hull will beforehand have received its painting colors. Now, it may doesn't look like it but there is definitively a left and right tubes. So, be very cautious when assembling parts together... 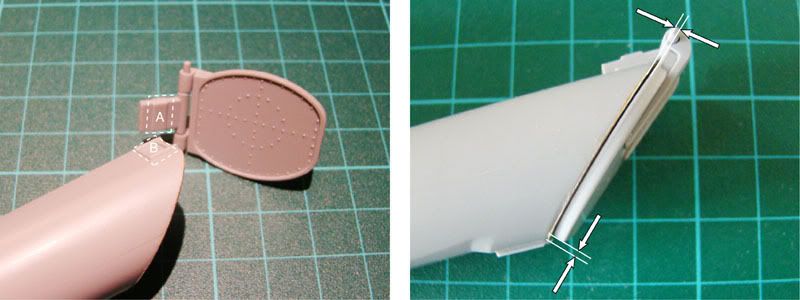 "A" is supposed to connect the movable door to "B." Seen from above, not at all a snug fit as you can see on the next picture. "A" comes in abutment to the left side of its housing ("B") and contributes to the bad positioning of the door. It was thus necessary to reduce the extremity of the block to get the right positioning. 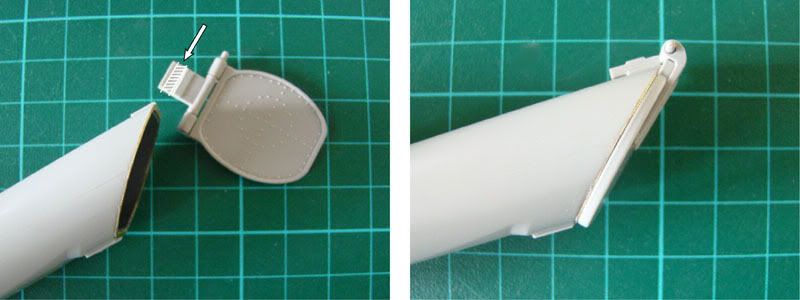 I didn't expect to confront myself to such a problem Italeri could have easily resolved...  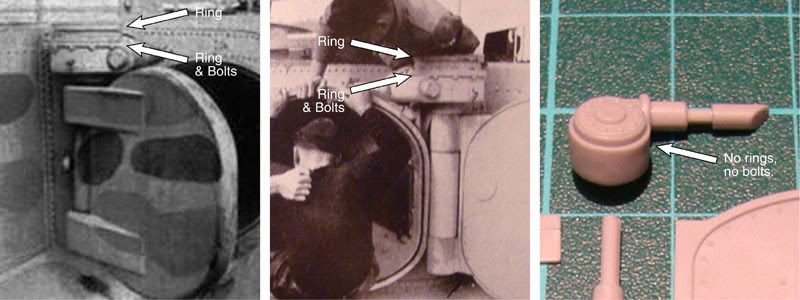 Sadly, not exactly a twin piece reproduced here and there's no much that can be done to improve it as it is much too tiny. You can't be more Catholic than the Pope or: "Il ne faut pas être plus royaliste que le roi" as we say in French... |
|
|
|
Post by Robert on Feb 21, 2009 17:13:48 GMT 1
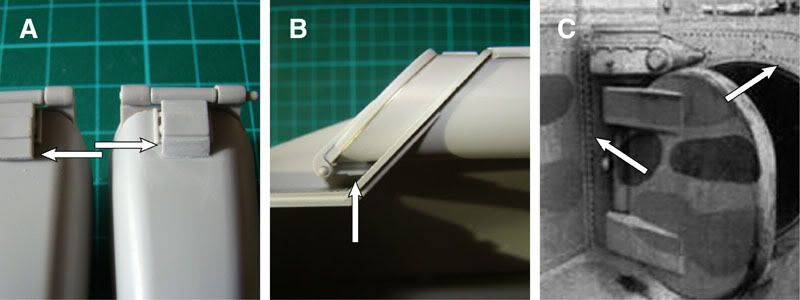 A: Finally, the piece had to be beveled to fit inside its housing. B: View from above the hull, tube into position. C: The second row of rivets is missing as well as the ones above the tube, so I ordered sets of ArcherTransfers to remedy this lack... For those who have an interest in building this model, Cammett Ltd. has released a set of two short depth charge racks with their six depth charges, a correct version of the armored bridge skull cap (Italeri's positioning of rivets is wrong) and plans to release next some canvas railing covers for the inveterate purists. cammett.websds.net/Also, in Germany this time, Schatton proposes a gun barrels set made of brass including three 2cm for the MG C/38 and twin mounted guns plus one barrel for the 3.7cm Flak M43. In addition are available six depth charges with their racks and six sea mines on their wheeled boxes. www.modellbau-schatton.privat.t-online.de/html/preisliste.html |
|
Deleted
Deleted Member
Posts: 0
|
Post by Deleted on Feb 22, 2009 10:30:49 GMT 1
Lots of attention to detail, will look good once complete. Can't remember if it was going to be r/c or static.  |
|