|
|
Post by Robert on May 16, 2009 19:55:01 GMT 1
Hello Gentlemen, Sorry if I haven't replied earlier but I had a client who was deeply in need of a job to be executed in a rush. Thanks for the link Mark, I didn't know it. Took me almost a day to see me granted the entrance. During Bush's era, it was quicker to receive a Guantanamo's member card. ;D Anyway, I gave a long look over it and found it quite informative with magnificent builds! ps: Eric, hope that Mark was sober. Was he handy with the straps of yours?  |
|
|
|
Post by eric on May 17, 2009 22:14:01 GMT 1
A bit too handy........I'm typing with my nose at the moment........
|
|
|
|
Post by Robert on May 25, 2009 18:27:11 GMT 1
Here's little 'Ha-Ju' (aka Hans-Jürgen, aka Schnellboot 205) again as seen on this new picture. To recreate the lateral partition of the pilothouse, I drew to scale, putting to place the visible elements: riveted square, rivets, pole base, fan cover and hook for the lifebuoy. Printed it on tracing paper to use as a guideline UND... Aarrrgghh! Nothing matched Italeri's mould! From now on, it will be called no more "schnell" but rather "langsame" boot or un-pleasure craft!  So, after a few tries fixing the rivets that required a long patience, I found myself quite pleased with the final result. Now, I wonder… what's expecting me next?  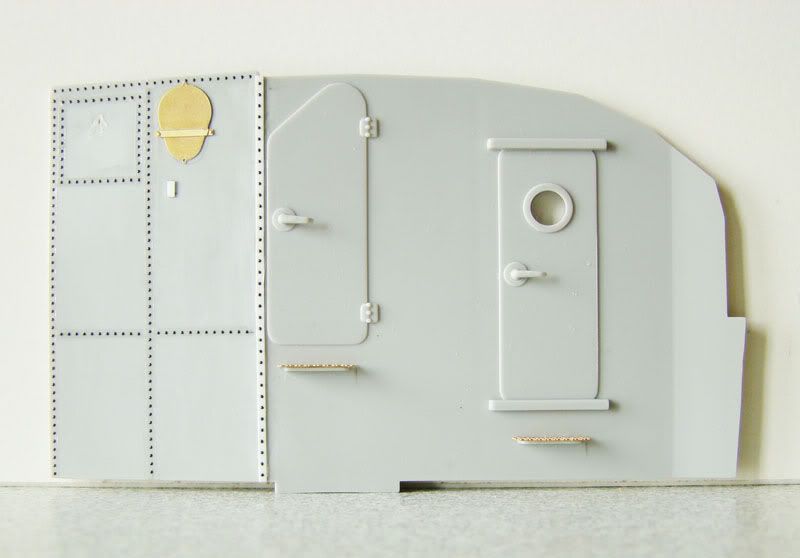 Mark, it’s good knowing there are wackoes all over the globe. This Dutch website on the Schnellboot build is just totally crazy. Not wonder then to find one of Chill’s cousins there, Mustang64 who has a penguin avatar too. It’s worth giving it a look for some finished details. www.modelbouwforum.nl/forums/bouwverslagen-schepen/72708-bouwverslag-8ste-schnellboot-flottille-italeri-1-35-a-98.htmlOne of the guys on the forum not only motorized his kit, but also reproduced the “Lürssen Effect,” a particularity that helped reducing the stern wave and keeping the boat at a nearly horizontal attitude.  and… and he even DID motorize the torpedo doors! Call in the medical aid team and make sure they don’t forget the straitjacket! That goes without saying: it is far beyond my abilities. Ask Markus, I can hardly recognize a resistor from a condenser! And how is our Eric's health going today? No more arms and nose pains lately? ;D Cheers mates. |
|
|
|
Post by Mark on May 25, 2009 21:46:05 GMT 1
That guy is clever !! There seems to be an lot of stuff in the hull. I wonder what the rest of it does !!
Eric seemed quite happy - I tossed another donut in so he didnt get too hungry. Don't tell him, but I hid the 'medication' in the jam.
|
|
|
|
Post by Baz on May 26, 2009 12:23:37 GMT 1
You and Poul are putting us poor amateurs to shame Robert. Keep the piccies comin' matie Just love the detail Makes it all worth that effort in the end Baz |
|
|
|
Post by ladybug on May 26, 2009 22:16:14 GMT 1
Hi there, I'm one of the guys (8 right now, 5 are RC converted) building the Italeri S100 1:35 in Holland, follow our approach on www.modelbouwforum.nl/forums/bouwverslagen-schepen/72708-bouwverslag-8ste-schnellboot-flottille-italeri-1-35-a.htmli used in my build 3 * Speed 400/7.2V motors with on the outer 25mm standard 3 blade Robbe 25 mm props and on the inner motor a hydro 26mm speed prop I've build my own 2mm shafts, because of the length you need, my motors are right in the middle of the ship rudders are the same form and size as the original plastic ones, but scratch made of messing 2 accupacks of 4600mAh 1 under the kalotte, and 1 between the engines and the rudders Torpedo doors can also be opened by remote (got i love my Robbe FC16) I can use the outer rudders for Lurssen effect (y-cable and two tiny servos), but for now i left them just in the neutral state, and still the boot has a nice flow through the corners. here are two films, that shows my boot on high speed www.youtube.com/watch?v=f7QxKWdDVGU&feature=player_embeddedMade by RAF www.youtube.com/watch?v=q_h3LeqBq_E&feature=player_embeddedMade by Freek And finally the shot of the four boats together (two of need some more time, to create brass railings, and some weathering, but then these boats will be almost finished too) The one on the left belongs to me.  Made by Frans  Made by Frans And as a grand finale for a few nice docs on the s-boot idisk.mac.com/flederus-Public?view=webThnks Puffin ( www.puffin.smugmug.com/gallery/7021366_QQb6R#449534664_yNDLe for some nice pics, he went all technical, nice construction for his torpedo doors and Lurssen rudders) Greetz Paul |
|
|
|
Post by eric on May 26, 2009 22:35:22 GMT 1
That guy is clever !! There seems to be an lot of stuff in the hull. I wonder what the rest of it does !! Eric seemed quite happy - I tossed another donut in so he didnt get too hungry. Don't tell him, but I hid the 'medication' in the jam. Wheeeeeeeeeeeeeeeeeeeeeeeeee...........more donuts please.......................!!! ;D ;D Great models, by the way! Most impressed with your mods Robert, superb! |
|
|
|
Post by Mark on May 26, 2009 22:52:13 GMT 1
Nice videos Ladybug. Your model has a good turn of speed. Now I've just got to put a Robber FC16 on my Christmas list  Lovely pictures of the four boats all together as well !! |
|
|
|
Post by Robert on May 27, 2009 17:49:15 GMT 1
You and Poul are putting us poor amateurs to shame Robert. Baz Thanks. Thanks to you all! Believe me Baz, compared to what Poul is achieving, I am a third class ship's boy! When you think I asked my missus for Xmas to buy me this kit to relax from building the Bissy, telling myself: "This' gonna be easy to assemble, everything's already in the box. No need of waiting for issues," I was light-years away from what was expecting me ahead! I have been listing on two A4 pages all the errors found to date Italeri did so far. And I am only half way. Not to mention the amount of money spent to get it right. I'll have to lock it somewhere once finished with a golden locker!!! But what the heck; now that the baby is here, I'm not going to throw him with the water bowl. Er, um... or should I? Eric, I'm warning you, those are anchovies donuts Mark is tossing you! |
|
|
|
Post by Mark on May 27, 2009 21:12:00 GMT 1
After the last lot of donuts he'll never notice |
|
|
|
Post by eric on May 27, 2009 22:22:52 GMT 1
Wha?......eh?.......ugh.........colours.......whoa.......
|
|
|
|
Post by Mark on May 27, 2009 23:31:11 GMT 1
Aweeeee, he's smiling again  Doesn't he look sweet. Must be the mountain air (or maybe the three month old anchovies  ) |
|
|
|
Post by Robert on Jun 14, 2009 13:07:52 GMT 1
Got two problems at hands that I can't figure out how to resolve for the moment... The first problem is that Italeri didn't supply the ammo racks (1) for the MG15s machine guns standing on both sides of the upper bridge's lateral partitions.  From various sources, I managed to bring them to scale but their width just do not fit in the available room! One more major dimensional error from the Italian company.  Now, if I do want to reproduce them, I only have two choices: - either I dare cutting the whole radio bulge (3) and move it by 1mm to the left, that way I can slip the ammo rack in the new enlarged gap, but this is total micro surgery that would destroy most of the detail... - or I simply trim by 1mm the right side of the radio bulge, a drastic measure.  Has anyone got any ideas or a shoehorn to lend that could solve the problem gently? Has anyone got any ideas or a shoehorn to lend that could solve the problem gently? I'm loosing my hair and getting almost a baldhead!!! The other minor detail Italeri got wrong is the way the seat is fixed. The pic shows two hinges (2) with rods going underneath the seat. Not one. 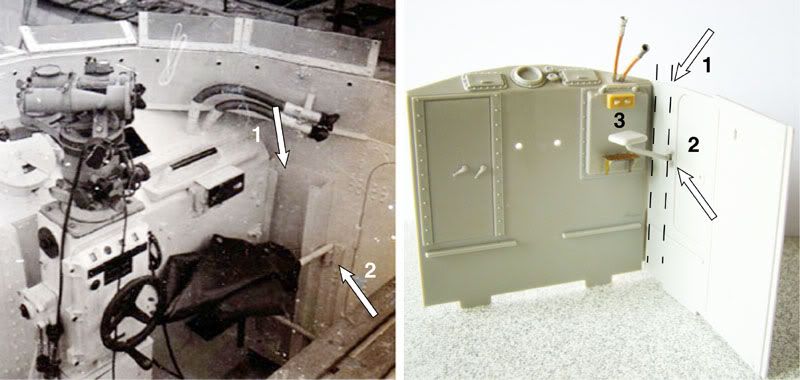 |
|
|
|
Post by Robert on Jun 14, 2009 13:24:50 GMT 1
The second problem concerns another dilemma, well several actually. Wouldn't bee fun otherwise. The big differences in between the model and the pics being: First, the gangplank (1): on the top right pic, one can see a British sailor standing on a gangplank on 'Lang,' that links the two ladders with a square platform at both edges. The pic. on the bottom right even shows the very same gangplank being in its folded up position on 'Ha-Jü.' Then, the circulator ventilator (2): had a door and was mounted roughly above and not below Italeri's location. And finally, the helmet rack (3): was standing on the back of (4) and held two helmets, not six. Which seems logical, if you consider this way helmets were within reach for those standing on the upper bridge. In other words, every raised detail on the back of the wheelhouse can be simply... removed.  Now you'll understand better why I've been silent all that time! The guys at Italeri's should have better started working their imagination on marketing a topped anchovies pizza donut. At least, we'd have known where to stand to. Cheers |
|
|
|
Post by Mark on Jun 14, 2009 14:08:30 GMT 1
How about this for the radio box conundrum. 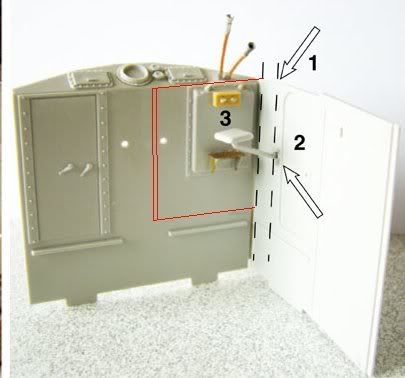 Cut along the red lines with a razor saw, removing about 1mm from the left hand side of the bit removed. Then simply shift it to the left and glue it back in place. Not sure if you've actualy got enough undetailed space on the corner to do that ? With a bit of luck you can put most of the cuts behind something else so you don't have to waste too much time filling and sanding them ? |
|


 Doesn't he look sweet. Must be the mountain air (or maybe the three month old anchovies
  )
)

