|
|
Post by markus on Dec 2, 2007 12:39:57 GMT 1
MARKUS, Thanks for that, but I am a little confused over point 3. I am considering first layer to be in 1.5x5x950mm and not using the short pieces from the kit except for the bow first four sections and split into 3mm wide instead of six mm supplied. Lets explore further , because I dont know, so what would be the effect if I used thicker 2mm........2x3 2x4 2x5 ..........  ?? If there is a different affect which is entertainable say so otherwise tell me to shutup and don't bother going there. I say that so you dont think...oh what a dickhead...don't be politically correct at any time just say what is, ok? I am also asking these questions cos dad just finished his hull except for six small pieces and he didn't glue edges of planks and he is going to have to seal the inside of the hull as well as the out side cos there is gaps and movement. Just coverying all options Kind regards to you and all ROB if you used 5mm planks for the 1st layer then 6mm planks are the right choice for the 2nd layer. thicker planks (2mm) are needed for above the armoured belt so you can drill small holes for fitting the etched railings afterwards. those 2mm planks shouldn't be used for the whole hull - they're more difficult to bend and will cause problems making the resin parts fit. i think that 8/2/1200 and 1,5/5/1200 (or 1,5/6/1200) are the best choice if you want your hull to be as perfect as possible. the main advantage is the smooth line of the hull because the plank goes from bow to stern in one piece markus |
|
|
|
Post by Smackmback on Dec 2, 2007 14:03:20 GMT 1
Markus,
thanks, thats alot clearer except for the 8/2/1200 could you just clarify where the 8mm goes?
The Deck ? Is the deck planked or is anyone going to plank if it isn't done in the kit.
If so ...what sizes length etc etc?
So far the only length listed is 950 mm but i will see if order is possible and how long it would take. It may mean an e-mail to you markus for a load of timber if you know what I mean, stuffed in a tube. If so.......how to pay you ?
|
|
|
|
Post by markus on Dec 2, 2007 14:41:45 GMT 1
Markus, thanks, thats alot clearer except for the 8/2/1200 could you just clarify where the 8mm goes? The Deck ? Is the deck planked or is anyone going to plank if it isn't done in the kit. If so ...what sizes length etc etc? So far the only length listed is 950 mm but i will see if order is possible and how long it would take. It may mean an e-mail to you markus for a load of timber if you know what I mean, stuffed in a tube. If so.......how to pay you ? you can pay via wire transfer or money in a letter pics show where the planks with 8mm width are located...  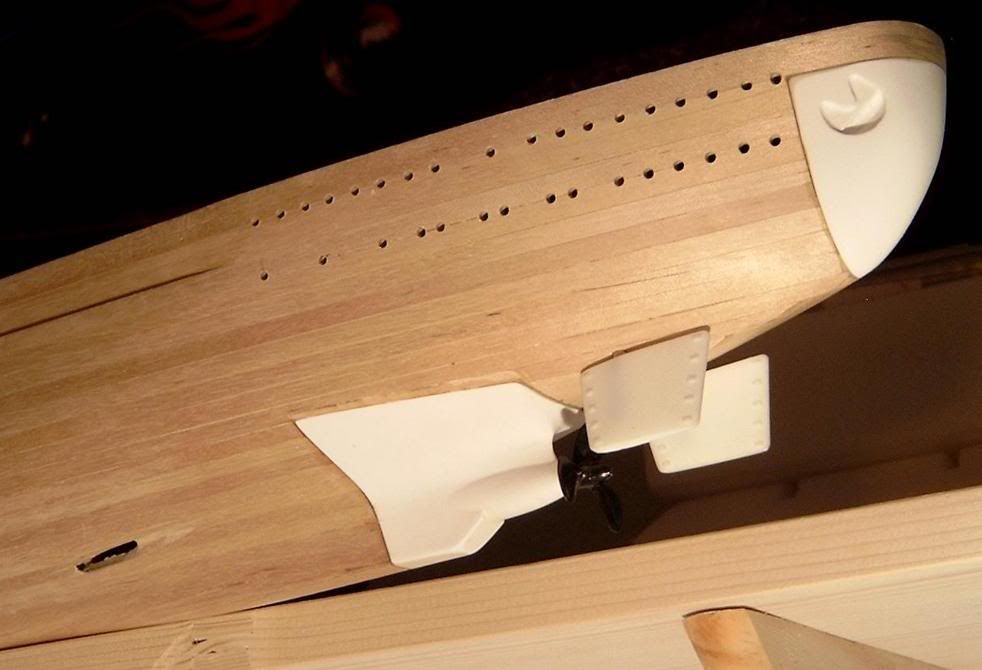 |
|
|
|
Post by Smackmback on Dec 3, 2007 13:31:49 GMT 1
Man, Markus...I am severely impressed....If that is your workmanship, I have not seen anything comparable on the net anywhere. That is exactly what i want to achieve in working with the timber in this model. I know it is all going to be covered up in the end ,but satisfaction is in the making. Question.......The photos are LIME or MAPLE ? Am I right in saying maple ? colour and tecture. Decking ?? What have you done or what mod changes ? ROB ps once again ...great workmanship. |
|
|
|
Post by markus on Dec 3, 2007 17:40:55 GMT 1
Man, Markus...I am severely impressed....If that is your workmanship, I have not seen anything comparable on the net anywhere. That is exactly what i want to achieve in working with the timber in this model. I know it is all going to be covered up in the end ,but satisfaction is in the making. Question.......The photos are LIME or MAPLE ? Am I right in saying maple ? colour and tecture. Decking ?? What have you done or what mod changes ? ROB ps once again ...great workmanship. first of all, thanks for the compliments !! yes, i used maple strips... must admit i will leave the decking as supplied, don't have the patience like ' decking master' don (swanrail) cheers markus |
|
|
|
Post by Smackmback on Dec 3, 2007 23:14:02 GMT 1
Great fantastic etc etc. Mate I will get back to you soon asap regarding planking and motors etc. OK swanny...!!!.... seeing as Markus hangs you up as decking master .....cough up ....whats your secret where do I go to learn your sectret ways. any pics or just simple advise and instructions ? Speak up or forever hold your peace...and that dosen't mean your piece.!!!!!!!!! Please put me out of my suspense ROB |
|
|
|
Post by Smackmback on Dec 3, 2007 23:26:01 GMT 1
Markus,
question from top photo of stern ....How did you achieve rounding of top plank above stern resin piece.
I also thought that every one had been talking about the stern top wooden piece was too big in dimensions but to use 8 mm around stern and end up flush with the resin add on uderneath it, it would have to be much smaller, in the "D" curve, if you know what I mean ( I hope) so as to be able to fit.
|
|
|
|
Post by eric on Dec 3, 2007 23:56:47 GMT 1
Hi Rob, if you look at Markus' second photo, you will see the anchor pocket. It is far too low, a problem created by the insertion of a wooden spacer above it. After furious complaints about it's poor design by the German model builders Hachette removed the wooden spacer and produced a resin piece that went higher up to the top deck. (unfortunatly, too late for the German builders)
The new resin piece juts out at the stern beyond the wooden hull by 1 or 2mm, so you either sand down the resin part untile flush at the stern, or do as Don and I have done and glue on a curved plank spacer over the stern.
I soaked my plank in hot water for several minutes, then bent it over the stern and held it in place till dry, then glued it. Steaming or soaking the planks makes them VERY flexible
|
|
|
|
Post by swanrail on Dec 3, 2007 23:57:39 GMT 1
Firstly, note that in Markus picture of his stern, he is using the original part 70, which had two layers of wood over the resin part. My version, (pictured elsewhere on the forum) show the new resin part 70, which has only one layer of wood over it. My circular piece of wood to cover the gap is thus 5mm by 1.5mm lime. The upper edge overlaps the deck part 63 by about 2mm, which is going to allow for the deck planking when fitted, and then sanded down level with the newly planked deck.
To form the curve, I took a 300 mm length of 5 by 1.5mm lime strip. I then held this over the top of an open electric kettle (to stop the automatic turn off working) and as the steam penetrated the wood, by pushing the ends inwards the centre part gradually bent into a curve and moved closer to the steam source. (n.b. be very careful not to scald yourself).
I finally reached the point where the two ends nearly touched each other, removed from the steam, held tight, allowed to cool of to a degree and then held aginst the resin part until completely cool (a few minutes). Again note that the curve MUST NOT be too tight or you will break the wood, you are aiming at a curve of about 2 inches diameter width at 2 inchs deep, in other words, an oval 4 inches by 2 inches if it was completely closed.
When dry, it had a tendency to spring slightly apart again, so I glued it into position using Evostik weatherproof wood glue and holding the plank in place with strong elastic bands. Left for a day, before trimming of the ends of the plank level with the resin part 70. (this allows the porthole strips to be fitted flush to the resin part 70 when received at a later date, I think in issue 42.)
Ref the deck planking, I started doing this about 50 years ago!! (phew!! doesnt time fly?) on scratch built clipper ship. Then, I bedded deckstrips into a cascamite glue mixed with black artists oil paint, so that when the planks were set, the glue oozed up between the planks and gave the caulked effect i wanted.
I have given a tutorial on this site which you can find in another section, it is based on my method of doing a couple of decks on this model, and which I intend completing the whole series of decks over the next 2 years! Note that this decking is not for the faint hearted, however with determination and practice with lots of patience there is no reason why anyone cannot do it.
|
|
|
|
Post by swanrail on Dec 4, 2007 0:06:48 GMT 1
Here is a repeat picture of my stern: 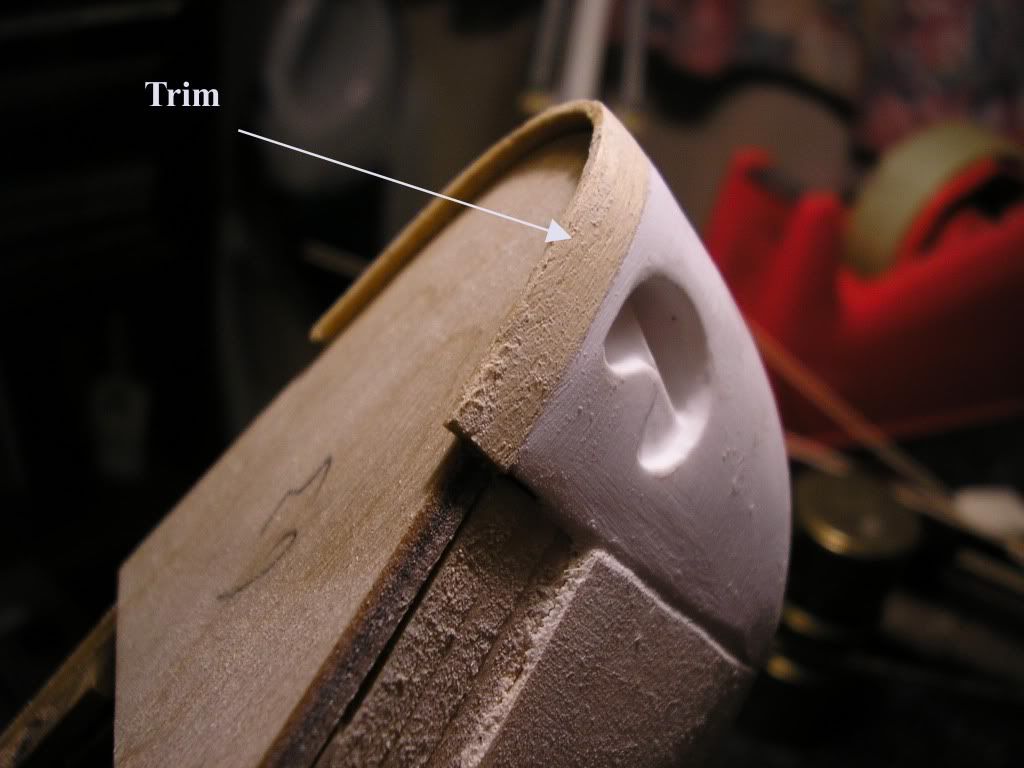 please ignore the sawdust, this came from sanding smooth all round!! |
|
|
|
Post by Smackmback on Dec 4, 2007 6:25:31 GMT 1
;D ;D ;D
ECCA...&..SWANNY,
Guys what do I say?....Thanks big time ...that puts a different light on the whole subject......There wqas a moment when things felt funny not right but I couldn't put my finger on it so I dropped the thought. I am so intent on getting the right feel of the planking I did not notice the depth difference on the stern.....TA!
Love the decking style, so I will be in that. I will want to know all about it ..so lead on
We are only due for the next batch of issues #16 onwards soon?
I have nearly finished the ribs but I am doing so much back reading on you guys from the beginning UK and GERMANY.
I am strolling along kickin a tin and making sure that everything is as straight as possible so far so good all dead straight.
Carving up for engine three is alittle nerve racking but it is getting there.
I am watching you all like a hawk.
I am so thankful all you guys keep a watchful eye out for all us others following along behind you. Its very reasuring that we will make it happen.
I don't know about anyone else, but in this day and age with all the negative hurtful things that are going on around the world, it is so good to make contact and friends all over the world.
Best Regards
Your Friend
ROB
|
|


 ??
??

