|
|
Post by griffin247 on Jun 8, 2008 12:35:51 GMT 1
|
|
|
|
Post by griffin247 on Jun 14, 2008 11:13:31 GMT 1
cool just ordered the rudders from here 2 of them with postage 8 of your british pounds
|
|
|
|
Post by popeye on Jun 14, 2008 21:03:09 GMT 1
If you go to my pictures at Flickr.com you can see the Raebosch propellors and 35mm graupner rudders from Cornwall boats  Click on the group called "Bismarck as at May 2008". The pictures show: 1. The fixing of the propellors with the m3 tapped hole in the propellor boss to hold it on a small flat filed on the shaft, as well as the screw and shakeproof washer. 2. The "A" frame to hold the propellor shaft tube in place and stop it shaking or rotating. The frame is made from a flattened piece of 6mm stainless steel tubing (one of a number of different sizes that I use in my steam plant and cider making plant). I flatten the tube initially in a vice then with a hammer. The reesult is a flat piece of metal that has smooth, rounded sides and is fairly tough - much better than just using a strip of brass or stainless steel. 3. Where the propshaft tube comes through the hull I have protected it with a shaped piece of plastic, made from a drawer handle !! It will be araldited to the hull in due course. 4. The rudder tube, through which the rudder shaft fits, has been strengthened by bending a piece of brass so that it fits round the tube, where it fits inside the hull, this has been soldered to the rudder tube. The "legs" of the brass piece than fit either side of the strip of wood that the rudder tube rests against and this helps position and strengthen the fixing of the rudder tube, as can be seen in the photo, before cutting off the excess shaft and fitting the wooden plate on top and connecting the radio control arms. The whole piece will then be araldited to the wood strip providing a solid fixture 5. I have added the extra 6mm wood plank on top of the existing hull planks to increase the height of the hull and provide a recess in which the deck planking fits (after sanding down the sides to get them to fit. I bent the wood around the anchor ports as well. Having glued the strip to the top of the existing planking I strengthened the joint by gluing a 5mm by 0.5mm thick strip over the joint, as you can see on the photos. 6. The rear plastic moulding that holds the 3rd propellor is fixed to the hull be drilling and tapping an m4 thread about 1/2 inch into the plastic and screwing it on to the hull from the flat area inside the boat. It will also be araldited onto the hull in due course. 7. You can see the pot of teflon grease, from my ship's chandler, that fills the prop shaft tube and greases the rudder shaft. 8. you can also see the shaft clamps to hold the shaft in place. The stainless steel ones are for external use and the plastic one will be used inside the boat either side of one of the frames that the propshaft tube passes through. The clamps come either as single screw type (as shown) which have to be passed over the shaft from one end or as 2-piece held together with 2 screws (i.e. it is 2 half circles that screw together) and can be placed over the shaft without having to dismantle everything and then screwed together. These are available fron RS components (RSWWW.com and search for "shaft collar" - and they deliver worldwide) at between £2 and £4 each. They are made by Ruland (www.ruland.com). They come as 1 or 2 piece in stainless steel, aluminium, steel and plastic. |
|
|
|
Post by popeye on Jun 14, 2008 21:05:38 GMT 1
|
|
|
|
Post by nm on Jun 14, 2008 21:13:41 GMT 1
Saw the pictures there OK, thanks.
NM
|
|
Deleted
Deleted Member
Posts: 0
|
Post by Deleted on Jun 15, 2008 1:09:31 GMT 1
A bit of a fiddle, but it can be done. 1. view the image you want to post and right click on it and select view picture, (or image). 2. Copy the url of the picture to here, (remove ?v=0 from the end of the url) 3. Paste the url into the reply box here, (after pressing the reply button) and highlight it. 4. Press the button that looks like it has a picture on it, (4th from left on the lower level). 5. This will place [ img ] and [ /img] tags in place minus the spaces, so the picture will show up here. Hope this helps, results below 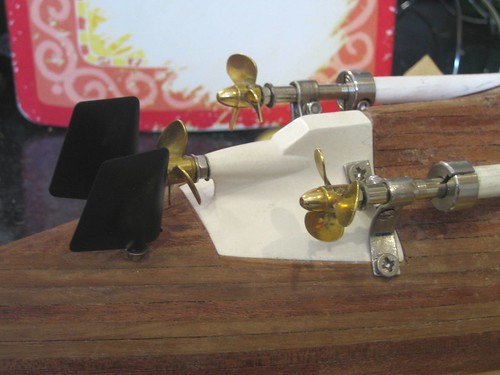 |
|


