|
|
Post by tanus on Jun 18, 2009 7:17:44 GMT 1
Hi Guys i am new to the site.What issue is everyone on,as i have just finished the turrets,and not for the feint hearted.If you have not done them,let me know,tips to make it easier.
For the rc people,one thing i did notice,i put my turrets in the sun to dry the paint,and the gaps opened,as the wood swells through the heat.
Tanus
|
|
|
|
Post by Achtung!! on Jun 18, 2009 7:32:26 GMT 1
I have been looking at the parts for the turrets trying to pluck up courage to do them. So what tips do you have - oh and welcome to the board  |
|
|
|
Post by tanus on Jun 18, 2009 8:50:02 GMT 1
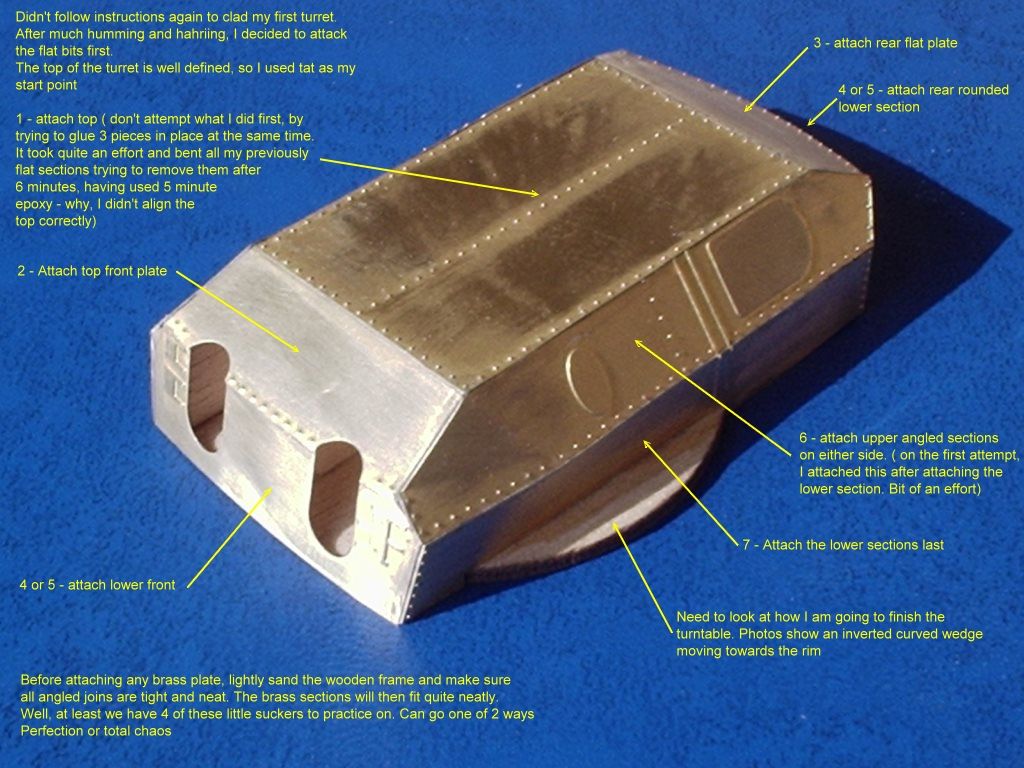
hi,first of all,the 2 upper sides need trimming,they are too long.fit the frontwith barrel cutouts,lower one then upper one.then put the top on,then the back sloping part.next put on the back bottom curved piece,as u can match it up to the sloping top,and glue.next dry fit the sides,and u will notice the ladder rungs on one side dont line up,and the top side piece too long.sand the ladder rung off the piece with no rivets (can be put back later with thin dowel.If you have to cut off the rivets to make it fit ,dont worry,as you can use white glue and a toothpic to put back later.hope it makes sense,please keep asking if unsure.
They are a pain in the---to do.
cheers Tanus.
|
|
|
|
Post by Achtung!! on Jun 18, 2009 8:56:49 GMT 1
Blimey quite a lot of modification - any one else on here had the same tolerance issues with the brass bits like poor Tanus here. Quite a baptism of fire!
Dont suppose you can post any pictures? With me I keep looking at the bare wood skeleton (courtesy of a very fine French person) and the brass cladding and I keep taking the plunge here and there - got as far as cutting a piece from the brass fret board.... ;D
|
|
|
|
Post by Achtung!! on Jun 18, 2009 9:04:13 GMT 1
Forgive me to member in question but some one on here posted pictures and a step by step method of putting the parts on, and I cant for the life of me think who it was...was going to put the hyper link on here for you.
|
|
|
|
Post by tanus on Jun 18, 2009 11:11:14 GMT 1
Hi achtung,pictures posted under tanus build.Here is the sequence by part number,it worked for me.fix 890,then fix 894,butt it up for a neat join,next fit 893 then 889.then bend to shape 888.so far you should have been able to position parts for a neat join.now try 886,and 892,this will now show you what u have to trim,repeat on other side.you may find ladder rungs dont line up on one side,if so sand off part 886 or 887 whichever does not match,no rivets on them,easier.put on parts886,and 887,then891,and 892.this sequence works,as if there is a slight overhang,its on 891 and 892,and u wont see it.fill gaps with K&H stop putty,masage into the gaps.This is good,as acetone removes the excess,saving sanding round rivets,and leaves a neat fill.As stated b4,if rivets need replacing,white glue and a tooth pic.Let me know how u go
Tanus.
|
|
|
|
Post by danny on Jun 18, 2009 18:28:29 GMT 1
chill, I believe skyfire had the step by step pic. tanusthat toothpick and white glue method works well, I've used it to simulate rivets on my 1:7 FW190D9 airplane model. |
|
|
|
Post by Achtung!! on Jun 19, 2009 8:12:22 GMT 1
Thanks for the confirmation that it was Skyfire - I ll have a awander to his part of the forum.
|
|
|
|
Post by Baz on Jun 19, 2009 8:34:39 GMT 1
Chill I had no problems with the 1st turret But they all seem different. I have 1 left to do I posted this on my build a few weeks back Does it help ?  Baz |
|
|
|
Post by Achtung!! on Jun 19, 2009 9:03:38 GMT 1
Looking at everyones posts on the turrets - it appears the tolerances between the four turrents leave something to the imagination.
|
|
|
|
Post by tanus on Jun 19, 2009 10:02:00 GMT 1
let us know how u guys get on with the turrets,in a couple of weeks i will let u know how the secondaries fit,as they are wood frame,clad with etch,HUMMMMMM
Tanus
|
|
|
|
Post by coenie on Aug 26, 2009 18:06:43 GMT 1
Thanks Baz, I followed your sequence and got it right first time.
Ok, I must say this is my first turret as well, so we'll have to see on the once still out there.
Another thing I discovered is if you file the edges of the photo edged parts at about 45 degrees towards the base, before joining them, they tend to overlap and mostly conceal joints perfectly if you file them slightly in both directions with a fine file.
Have a K for helping me in this part.
|
|