|
|
Post by russ on Jul 16, 2007 19:37:14 GMT 1
for the 1st bow plank i just put it on left the clamps on it for 2 days tilt he glue had dried and then took them off. it was time consuming gettin the plank on and alighned but in the end it stayed and looks good
|
|
|
|
Post by Achtung!! on Jul 17, 2007 11:14:39 GMT 1
Just seen your picture on the bow planking situation - that helps a lot - going to have a go at your method. Although I dont have the clamps like you, I am sure I can improvise something. Just gave you some karma!!  |
|
|
|
Post by Mark on Jul 17, 2007 12:47:21 GMT 1
Thanks Chill. You should find pins work just as well.
|
|
|
|
Post by matt on Sept 2, 2007 20:55:51 GMT 1
Don (swanrail)
What is the name of the two part wood filler that you are using? Also where can you purchase it? Thanks
Matt
|
|
|
|
Post by swanrail on Sept 2, 2007 23:41:52 GMT 1
Mine is by Ronseal, local ironmongers should carry it, else try Screwfix (page 143 of their catalogue).
|
|
|
|
Post by matt on Sept 4, 2007 19:30:51 GMT 1
My tip with planking is i drill a hole in the plank smaller dia than the pin.Just helps to guide the pin in and stops splitting the plank especially at the ends.
Matt
|
|
|
|
Post by Mike B on Sept 16, 2007 20:05:49 GMT 1
I am in South Africa and I have just started with issue one after building the Titanic. I have just been reading this thread about the deck planks being of different thicknesses and can maybe offer a solution. Sapele edging veneer (not pre-glued), as used to edge chipboard is a nominal 0.5 mm thick x 20mm wide. This can be glued to the deck prior to the application of the thinner decking. This should substantially reduce the amount of sanding required to level the two types of deck plank thicknesses.
Mike B
|
|
|
|
Post by Mike B on Sept 16, 2007 20:41:13 GMT 1
Another tip about plank bending. Although there does not appear to be drastic plank bending on the Bismarck from the threads I have read, it might help with other plank on frame models you may attempt, especially sailng ship hulls. My friends and I use liquid household ammonia available from the local Hyper for bending planks, even edgewise. Just dip the plank into the bottle for a couple of minutes and then either put it into a home-made bending jig or pin or clamp it to the frames until it dries. It will retain it's shape when removed and can then be glued back without any stress (the ammonia does not affect the PVA adhesive). A plank can also be pinned into position and the ammonia painted on. It does not affect the glue of planks already affixed. This is far safer than steaming and some serious bending can be achieved.
Mike B
|
|
|
|
Post by Mark on Sept 17, 2007 5:03:05 GMT 1
Hi Mike B,
Good tip about using ammonia to bend planks. I've heard that it's very effective, but never tried it. I've never found ammonia is the shops in the UK (not that I looked that hard.) However, Ammonia is an irritant, so needs to be used with care.
I would suggest just attacking the deck with some coarse sandpaper to level it. The planks are quite soft and sand easily. It's probably quicker than building up the surounding area, which is actually less than 0.5mm on my model.
|
|
|
|
Post by Mike B on Sept 21, 2007 10:22:18 GMT 1
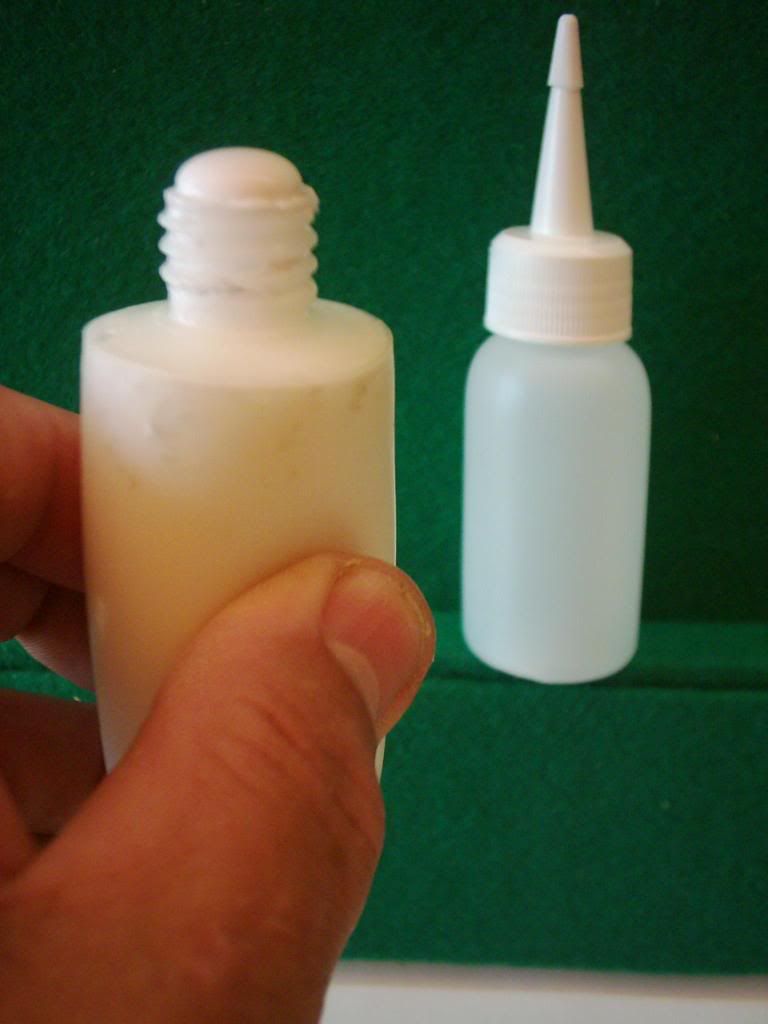
Hi guys, Here are a few general tips (see pics attached). Tongue depressors are an excellent source of high quality wood. They can be used for a multitude of tasks: stirring paint, reinforcing gussets, fabricating parts, repairing damaged parts etc. They are very close grained, sand easily and the dust makes a good filler mixed with PVA. They can be obtained in bulk from medical supply stores. A box of 500 cost me the eqivalent of £2.25 !!! The second tip is to obtain small plastic bottles from craft shops and decant your glue into them. The thin nozzles are great for applying glue to the edge of planks. Take the top off the bottle and you can use a brush dipped into the bottle. As the glue level goes down in the bottle, squeeze the side of the bottle until the glue comes to the top and you can keep the stem of the brush clean.   Mike B |
|
|
|
Post by trev on Sept 22, 2007 6:34:11 GMT 1
Most chemists sell amonia strangely enough.
|
|
|
|
Post by stevo1902 on Sept 24, 2007 13:29:35 GMT 1
Hi Mark
I've studied your planking photos but I've never seen those planking clamps before. How do they actually work? Are they a fairly common accessory sold by hobby stores?.
Thanks
Steve
|
|
|
|
Post by Mark on Sept 24, 2007 16:25:37 GMT 1
I got them off Ebay, but they are sold in the UK by www.plankonframe.com (or .co.uk) Simply drill a pilot hole in the frame, and then the screw part of the clamp screws through the sticky out bit hold the plank in place. |
|
|
|
Post by Commander Popeye on Oct 25, 2007 12:27:34 GMT 1
For the second layer of hull planking I have bought 5mm x 1mm x 1m strips from my local model shop (Sussex Model Shop, Worthing, West Sussex, UK). This means that I can put each strip on virtually the whole ship length in one go. This will give a much better finish and will be stronger. (see more details of my building in the "Weight of the model" section of "Radio Control" forum)
|
|
|
|
Post by gerrybuilt on Nov 4, 2007 2:21:43 GMT 1
I have also used very long thin planks for the second planking.I bought them from a local art shop. They supply for every art medium you can shake a stick at.
But I digress; The only thing that may cause a problem useing long planks is that the glue tends to go off at the start of the plank by the time you have reached the end of the damn thing.
So my answer is to bung lots of glue on and work fast with the plank. Lots of glue means that you almost saturate the plank with liquid glue and the plank will follow the hull shape to perfection. Just wipe the planks with a fairly damp sponge/cloth to remove excess glue. This will also ensure that planks are properly stuck down.
|
|