|
|
HMS Fly
Jan 12, 2008 15:47:55 GMT 1
Post by ph on Jan 12, 2008 15:47:55 GMT 1
Well i went out to model shop in Edinburgh and got meself the HMS Fly.
I haven't started it yet,I'm trying to get loads of info so i dont make a mess of it,
The instruction and plans are good and seem easy to follow fingers crossed.
I will post some pics soon.
well got me next lot off issues so back to me Bismark
cheers
paul
|
|
|
|
HMS Fly
Jan 12, 2008 16:30:58 GMT 1
Post by eric on Jan 12, 2008 16:30:58 GMT 1
Nice one Paul, look forward to seeing your photos!!!
|
|
|
|
HMS Fly
Jan 12, 2008 18:19:45 GMT 1
Post by swanrail on Jan 12, 2008 18:19:45 GMT 1
Just had a look at the model as supplied by Euromodels, it looks very good, very similar to my Granado by its appearance. Be warned however, my model took nearly two years of fairly concentrated effort and to build it in tandem with the Bismarck will take some effort, especialy now that we are moving into the fiddly bits with the brass work!!!
Shall look forward to your build pictures with interest.
|
|
|
|
HMS Fly
Jan 12, 2008 22:30:52 GMT 1
Post by nm on Jan 12, 2008 22:30:52 GMT 1
For all you people looking for an aircraft carrier, this must be it! HMS Fly.
NM
|
|
|
|
HMS Fly
Jan 13, 2008 21:57:00 GMT 1
Post by ph on Jan 13, 2008 21:57:00 GMT 1
I wont be rushing the fly gona take me time.
It will give me something to do inbetween waiting on issues turning up.
ill post some pics when i start.
|
|
|
|
HMS Fly
Jan 13, 2008 23:37:37 GMT 1
Post by Mark on Jan 13, 2008 23:37:37 GMT 1
Looking forward to them Paul
|
|
|
|
HMS Fly
Feb 26, 2010 22:34:24 GMT 1
Post by ph on Feb 26, 2010 22:34:24 GMT 1
|
|
|
|
Post by Mark on Feb 27, 2010 0:07:14 GMT 1
Coming on nicely Paul. She looks like a challenging model to build !
|
|
Deleted
Deleted Member
Posts: 0
|
Post by Deleted on Feb 27, 2010 1:14:58 GMT 1
Looks nice, was sort of thinking of doing the HMS Fly, (or the HMS Pegasus) as my next build.  |
|
|
|
HMS Fly
Feb 27, 2010 15:03:03 GMT 1
Post by ph on Feb 27, 2010 15:03:03 GMT 1
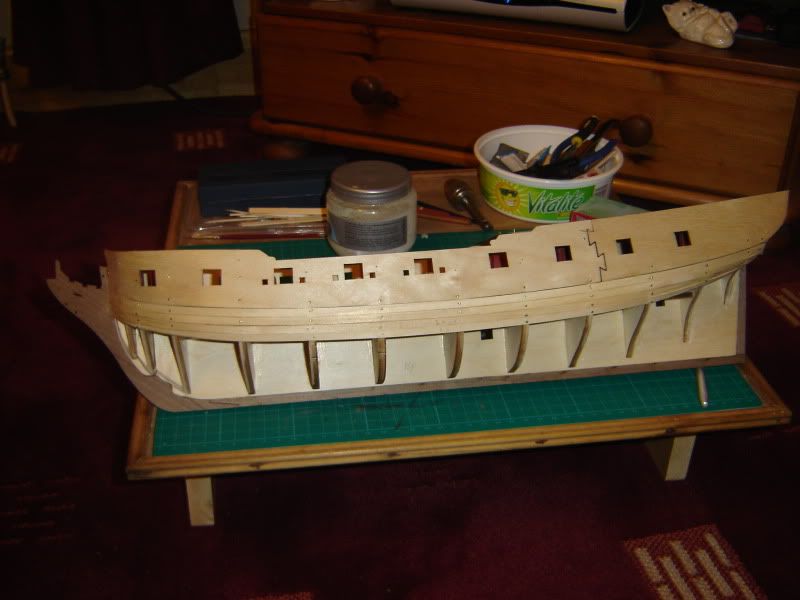
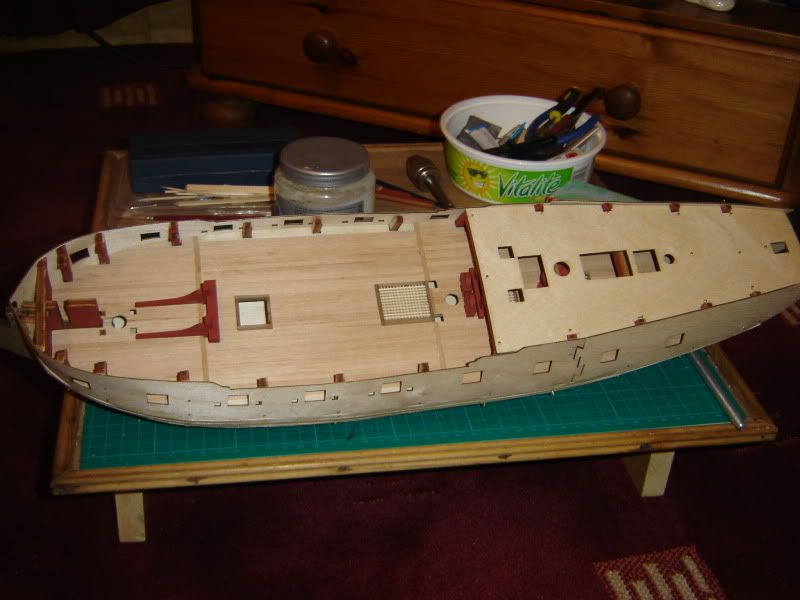
she is a pain in neck Mark but its got to be done,well the planking anyway,its the back of the boat thats doing me head in trying to get it rite.i no its only the first lot of planks so filler will come in handy.
Sky,you have more skill then me at planking boats,you should get this 1,she is a nice looking boat and plenty to do to build her,i only got it cos off the picture on the box when i was looking at getting a wooden model.think i should got something more easy for me to do to start with for more practice.
any tips will come in handy
|
|
|
|
Post by swanrail on Feb 28, 2010 1:24:12 GMT 1
Hi ph,
with the planking, it is essential NOT to force planks out of their natural shape. Steaming (or soaking in hot water) softens them and permits bends, but too extreme.
My technique is to let the planks pin up tight to the one above on each frame, and then towards the bow and stern, using steaming let them follow the curve of the frames BUT NOT IN THE VERTICAL PLANE. (planks bend easier on the narrow width and very difficult on the wide one)
This leads to gaps of a triangular nature. This also happens with real wooden ships!!!
I then use an overlay technique where a plank is laid against the upper plank for the distance of the gap, and the next plank down is then laid over that one. By cutting along the top edge of the lowest plank, you land up with a triangular piece from the middle plank, officially known as a "stealer". The stealer is then glued into place and the lower plank butted up tight against it. This often has to be repaeted several times if the hull has sharp curves at either end.
|
|
|
|
HMS Fly
Feb 28, 2010 22:37:37 GMT 1
Post by ph on Feb 28, 2010 22:37:37 GMT 1
thank you very much for the tips swanrail thay will come in very handy,here is some more pics of the back end of the model this is were im gona have the most trouble with,it looks ruth i no,but its only the first lot of planks so ill use filler to fill any small gapsthay are not glue on yet just pined in place after soking in hot water,there is more planks to put on top which i will have to make them fit rite cos thay dont get painted over. 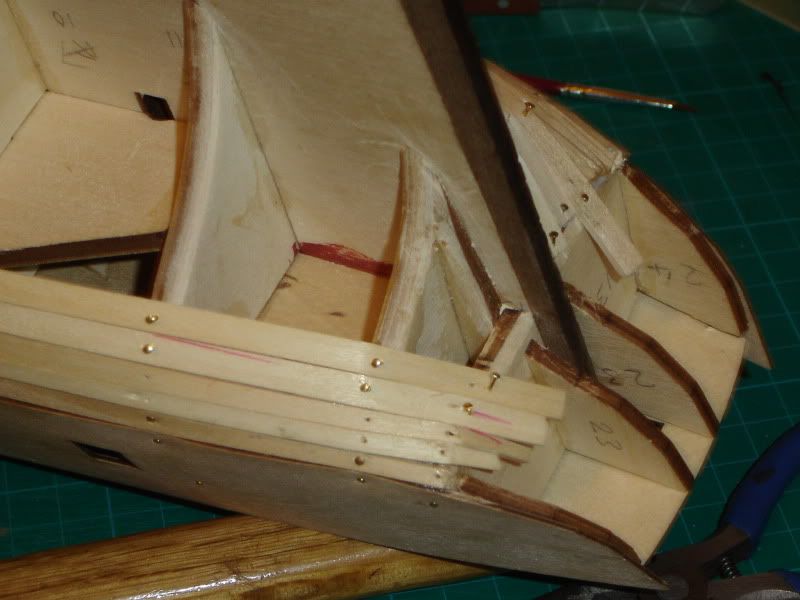 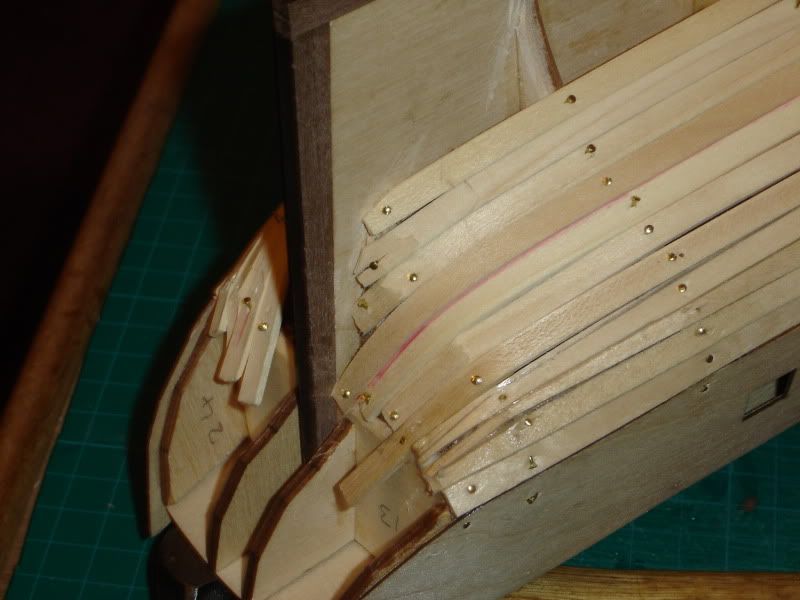 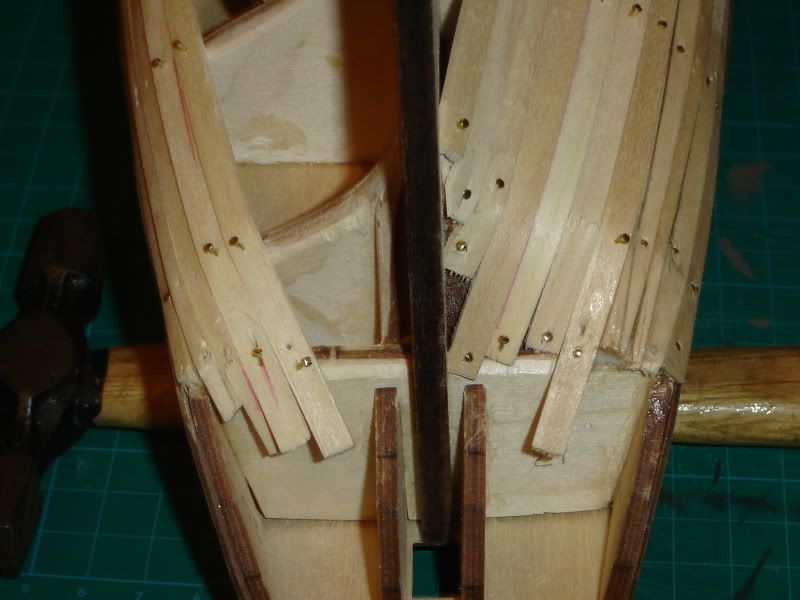 is it best to steam the planks or soke in hot water,iv found that when i take the planks out of the water time i get to pining them to the frame thay are cold ,iv broke a few planks trying to bend them even just a little bit. PS can you post some pics off your ships hulls for me please aspesh the back end to give me some idea as how thay lay |
|
|
|
HMS Fly
Feb 28, 2010 23:10:12 GMT 1
Post by ph on Feb 28, 2010 23:10:12 GMT 1
forgot to ask about this bit 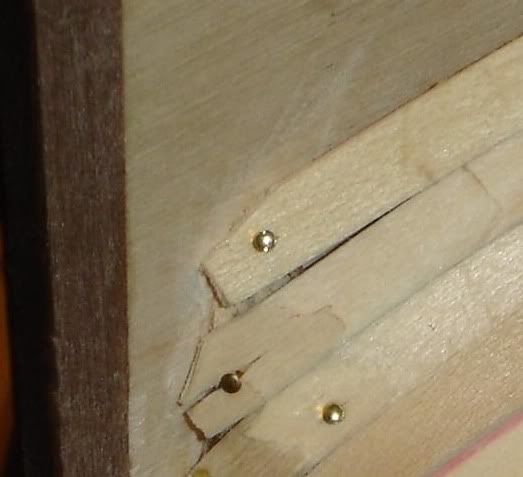 the planks have got to go rite upto the brown wood pleace but if i do that time i put the second lot of planks on thay will be stuck out way behond the brown pease,when it should be flush hope you under stand this lol. |
|
Deleted
Deleted Member
Posts: 0
|
HMS Fly
Feb 28, 2010 23:55:55 GMT 1
Post by Deleted on Feb 28, 2010 23:55:55 GMT 1
A hint for the stern, fill the gaps between the bulkheads with balsa wood, (shaped to the frames). This will give you more wood to glue the planking too.
I'm thinking of getting the HMS Pegasus, sister ship to the HMS Fly, (it will be after the trip to the UK) and adding balsa to the hull betweeen each bulkhead below the lowest deck, makes planking easier as you have more to glue too then.
|
|
|
|
Post by swanrail on Mar 1, 2010 1:21:21 GMT 1
Looking at your pictures, it looks as if you did not chamfer the last frame enough, as there seems to be an angle on the planks.
I always dry run planks to make sure that the chamfering is enough.
I would also recommend that the planks are at least 2 inches too long, then you will not split the ends when ?nailing. I use map pins instead, very sharp points so easy to push in, and then removed when glue dry.
Soaking in hot water must be done for a minimum of an hour, else the wood is not supple enough. Thats why I prefer steaming over an open kettle. I always over-do the bend, so that it is about right as it cools. Keep testing it against the frames as you steam.
Will see if I still have photos of my Grenado, which is very similar to your Fly. She was second planked with walnut over first layer of lime.
Second layer about 1mm thick, so found it easiest to soak in hot water.
As I did not want any holes to show on the second layer, glued it into place using superglue. With the planks being damp, the superglue sets very quickly and very hard, so you need to be on your toes with that one! (with that technique, I dry run the next plank after that glued so that the stealer could be made and fixed before fastening the second one, to cut a stealer once two planks have been glued is nigh on impossible. It is important that the first set of planking is as good as you can possibly make it, especially with a very thin second coat as that will show any blemishes. I spend a lot of time sanding down the first set and filling any minor imperfections.
|
|