|
|
Post by rod on Oct 22, 2009 6:30:31 GMT 1
Smack me with a Koala Baz, thats more build diary than Mark has managed to do in 2 years, right in one post.. (sorry just had to have a dig - I'm an Aussie you know..)
But seriously, that's one mighty fine looking vessel. Your hull is looking very smooth. it will look excellent once the paint goes on. I assume the dark grey on the superstructure is the primer rather than the final colour.
Its always good to see how people are getting on with their whole model. Here's some special K's coming your way for an excellent job that outshines us mere mortals.
cheers
Rod
|
|
|
|
Post by Baz on Oct 22, 2009 7:36:10 GMT 1
I assume the dark grey on the superstructure is the primer rather than the final colour. Rod Verrrrrrry interesting Rod ......    Actually the ship is painted all the same colour at the moment - light grey etch primer ! (all except the funnel which is painted with Tamiya XF-54, dark sea grey - and that is too dark me thinks also) So its all a trick of the light ......    (Ahhhhh, nothing like a bit of Mike Oldfield - was that song from 'Crisis' or 'Discovery' ? - 'Trick of the Light' that is) And thats what makes it so hard trying to match colours from photographs |
|
|
|
Post by rod on Oct 22, 2009 7:54:38 GMT 1
I just reread my post and realised that something I have been taking for granted as a common phrase, may actually be misconstrued by most people. Apologies for that.. I'll have to edit my post and perhaps use more appropriate global language.
Baz, interesting thats a grey primer. Is it a cheapie one or the Tamiya primer? I used a cheap light grey primer, that actually turned out to be too thick, but came out almost the right colour I wanted. Interesting how the photo does make it look dark.
I am using TS81 Royal Grey for the final finish on mine and left the primer as the hull colour.
cheers
Rod
|
|
|
|
Post by Baz on Oct 22, 2009 8:08:59 GMT 1
Baz, interesting thats a grey primer. Is it a cheapie one or the Tamiya primer? Rod No Rod, I don't think its a cheapie, its a professional car primer designed to attach to metal. Sicks to the wood like .... to a blanket. Sprays on beautifully. Designed for sanding, gives a magic finish. Far easier to use than the modeller acryllics. |
|
|
|
Post by Baz on Oct 22, 2009 8:13:00 GMT 1
|
|
|
|
Post by modelboatmayhem on Oct 22, 2009 13:58:53 GMT 1
Ah, got ya now Baz. Any idea why they fitted a cone shaped plug rather than just fitting a blanking plate ? |
|
|
|
Post by rem2007 on Oct 22, 2009 16:12:34 GMT 1
Hi Baz,
the plastic bits the prop shafts come through, did you hollow those out from the ones provided?, not the a-frames
I'm think that the propeller shafts didn't have coverings between hull outlet and a-frames to aid in cooling the bearings and glands, were the shaft comes out of the hull. Use to have to do temp readings in the gland spaces every hour on a HMCS destroyer, hard to tell frm your picture.
Robert
|
|
|
|
Post by Baz on Oct 23, 2009 21:36:02 GMT 1
Hi Baz, the plastic bits the prop shafts come through, did you hollow those out from the ones provided?, not the a-frames I'm think that the propeller shafts didn't have coverings between hull outlet and a-frames to aid in cooling the bearings and glands, were the shaft comes out of the hull. Use to have to do temp readings in the gland spaces every hour on a HMCS destroyer, hard to tell frm your picture. Robert Hi Robert I will get back to you with a glossy 12 x 10 with circles and arrows and a paragraph on the back ..... later in the weekend Off to bed now for a couple of hours sleep .... even though the sun is up .......    Baz |
|
|
|
Post by Baz on Oct 23, 2009 21:37:36 GMT 1
Ah, got ya now Baz. Any idea why they fitted a cone shaped plug rather than just fitting a blanking plate ? Very logical explanation MBM ......  |
|
|
|
Post by Mark on Oct 23, 2009 22:26:46 GMT 1
Indeed - a very astute observation.
|
|
|
|
Post by Mark on Oct 23, 2009 22:35:33 GMT 1
You model is turning out really well Baz. The improvements to the prop shafts are a great improvement.
|
|
|
|
Post by Baz on Nov 2, 2009 7:21:31 GMT 1
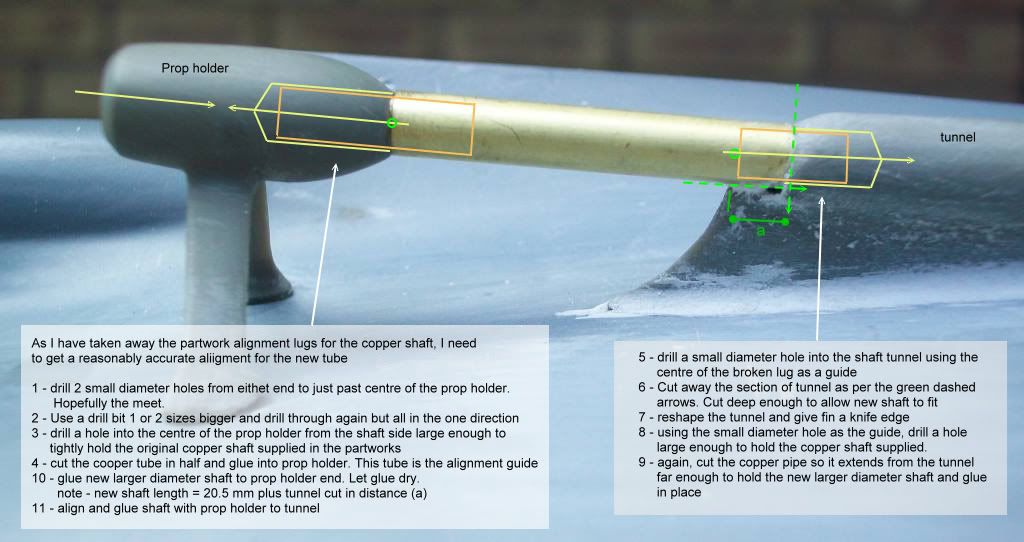
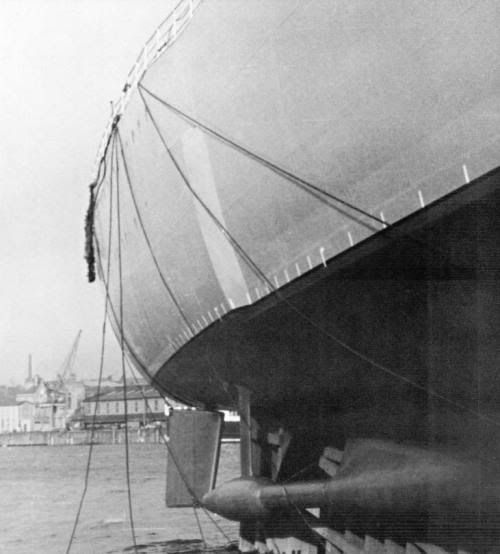
Hi Baz, the plastic bits the prop shafts come through, did you hollow those out from the ones provided?, not the a-frames I'm think that the propeller shafts didn't have coverings between hull outlet and a-frames to aid in cooling the bearings and glands, were the shaft comes out of the hull. Use to have to do temp readings in the gland spaces every hour on a HMCS destroyer, hard to tell frm your picture. Robert Hi Robert Sorry about the long length of time to reply Here is how I modified the shaft  Also, I was trolling around Sergey's Russian site and came across another interesting picture. Sergey assures me the photos are copyright free so here it is. Definitely looks like the prop shaft is totally enclosed  ps - at least you have a camera - think the wife has swallowed mine. Can't find it anywhere ........  Baz |
|
|
|
Post by sws35 on Nov 2, 2009 18:54:58 GMT 1
Hi Barry!  My friends are very interested in how you decided this one oblique angle (arrow) tells me that the steel plate around the deck is called the waterways. But in the dictionary of 34000 words, I did not find this word. Sergey |
|
|
|
Post by rem2007 on Nov 2, 2009 20:23:59 GMT 1
...thanks Baz, one more quick question is yours an rc model?
Robert
|
|
|
|
Post by swanrail on Nov 2, 2009 21:37:43 GMT 1
HI SWS35,
Ref the waterways, in your picture the sailors feet are actually In the waterway.
It is the part between the steel upright, and the wooden deck inside. There is a channel of about 30cm width and the thickness of the wood deep. It is where the water goes off the wooden deck, and there are drain pipes at frequent intervals feeding the water outboard (these have NOT been included on the model). Also known as "scuppers".
Hope that helps!
|
|