|
|
Post by david on Feb 9, 2008 15:46:40 GMT 1
Hi AFK,
I also had to remove the foredeck after it had been stuck down. As Don says 'Again this was done with a sharp craft knife, a lot of pressure and patience!!'
Don't be afraid, you know you want to do it really!
David.
|
|
|
|
Post by afkmatrix on Feb 9, 2008 16:33:58 GMT 1
Oh I am preparing now  I have taken my extra stern ply wood and taped it on and drawn on the front ply wood outline so i can cut that. Then i will approach taking the front foredeck off eek. Now from reading the post where Mark put the water cooling template on the wrong way round and used an iron to loosen the glue I was thinking of trying the same thing with the foredeck? Put some brown paper over it and steam the top of the foredeck and then maybe the edges of it, what do you think will this loosen the glue? Also could either David or Swanrail measure where the break will come on the foredeck? I have the Anatomy book but no scale rulers here to measure at 1/550 so can't tell where I have to make the cut. Ta EDIT: Also what did you do with your extended planking Swanrail? Did you continue it all the way up to the fron resin part or stop it at the fixed part of the foredeck? |
|
|
|
Post by swanrail on Feb 10, 2008 1:04:13 GMT 1
I should definitely try the iron method first, you have nothing to lose!!
My break in the hull occurs at 200mm from the current leading edge of the resin part at the bow. It is 20mm wide and sweeps back to 235mm from bow. Davids might be slightly different? but that is my intereptation from the book.
My extended planking goes from the foredeck break (the original one) right around the stern (encompasses the steamed part over the stern resin 70a) and back to the other side.
It was sanded level with the deck so that the whole lot from stem to stern was flush. The top edge was bevelled at at about 30 degrees.
I have fitted the margin planking (waterways) right around the hull. On the extended part, they are fixed to the removable deck, on the foredeck they are the same width as the main deck ones plus the thickness of the extended planking, this levels up the inside edge.
Because I did not want to disturb this margin planking, when I cut out the foredeck, this was inside the margin plank. If you look at my recent pictures, you will see that the foredeck part now attached to the maindeck, is of less width!!!
|
|
|
|
Post by david on Feb 10, 2008 18:19:16 GMT 1
Hi AFK, Scaling up from such small plans as the Brower, is apt to be a little uncertain but, in the absence of something better, I'm in complete agreement with Don's measurements. The only thing I can add is that the breakwaters appear to be raked at an angle of 40-degrees as shown below. David 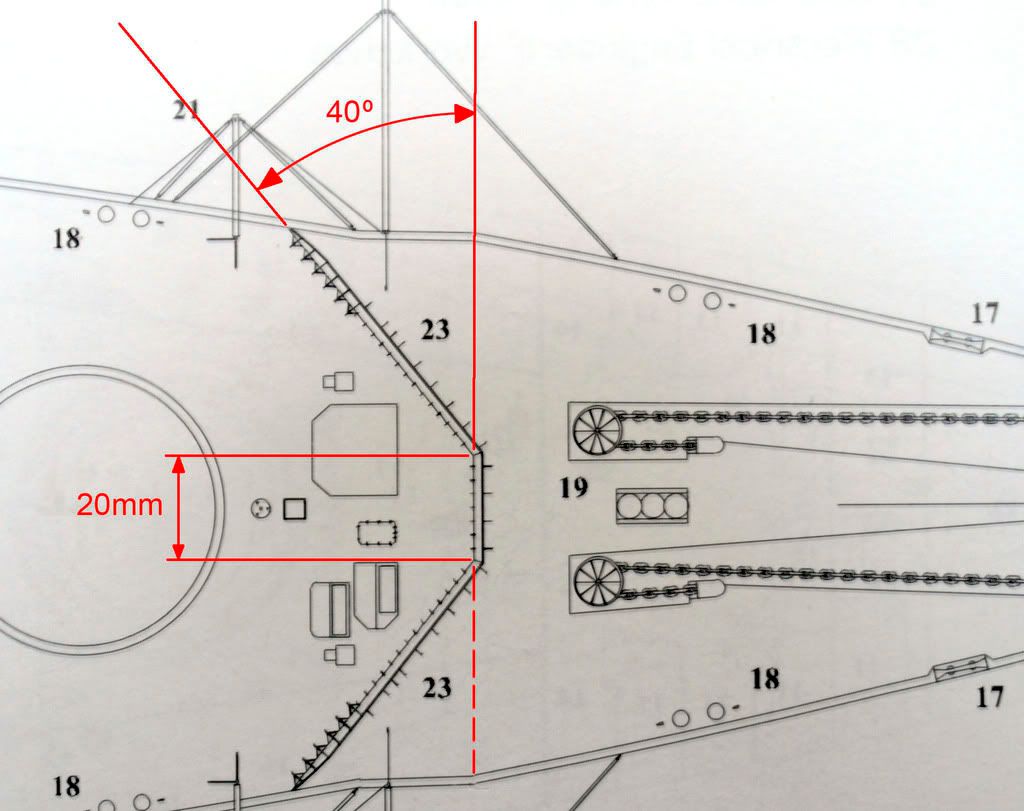 |
|
|
|
Post by afkmatrix on Feb 10, 2008 19:32:19 GMT 1
Thanks guys. Well the Iron, some baking paper and a little leverage worked a treat. I think just to clarify things for the measurements did you mean the very front resin part and not the part with the anchor points? As when I measured it from the resin anchor point piece it turned out wrong. So referred back to my Anatomy book and saw that the 20mm piece is in line with the kind of wiggle in the foredeck and worked it out from there. Will post some pics up in my Diary soon. I also had to think of a different way of attaching it to the main removable deck as well, so will show that to.
|
|
|
|
Post by david on Feb 10, 2008 22:42:01 GMT 1
I think we both mean to the extremity of the resin piece. Mine actually measures 203mm, but whats 3mm between friends! I think there are bound to be slight differences between builds, and 3mm is nothing in this context; the final layer of decking will hide a multitude of sins.
An important thing to consider is that if you are repositioning the removable deck, your choice of position for the breakwater might not exactly coincide with Hachettes plywood or laser-cut decks. In this case you should be prepared to make some (more!)adjustments. David.
|
|
|
|
Post by afkmatrix on Feb 10, 2008 23:00:19 GMT 1
Hi David, Yeah I have realised that because of this mod that the laser cut decks won't fit as per instructions. But I aim to do the decking by hand, gonna be ordering a bucket load of 1.5mm by 1mm pieces of wood And I think personally a better measurement is from the rear of the foredeck ply as if memory serves that works out as 130mm to the front 20mm piece, will confirm this though. EDIT: Ok its 135mm from the stern of the foredeck to the 20mm piece. |
|
|
|
Post by rem2007 on Feb 10, 2008 23:08:22 GMT 1
hi don.
footy weekend for the little guy so not much building. still carrying on with planking issue 35, so if i'm doing the side extensions mod, i see its good to leave the foredeck off whilst this mod is carried out, but what about the resin pieces bow and stern, sorry if i'm repeating previous questions. does theside extension go all the way around or just the foredeck and removeable decks?
robert
|
|
|
|
Post by swanrail on Feb 10, 2008 23:29:35 GMT 1
To clarify my cutting of the foredeck, I gave the measurement from the front of the resin bow piece as now fitted, but as David says, to measure off the plans is difficult.
I had noticed that the flat portion of the breakwater coincided with the hull starting to go in (the squiggly bit!!), and thats where I drew my cut marks, as per Davids diagram which shows it pictorially. The measurement I gave you I took off later!!!
I am now well into plankiong the fixed foredeck (pictures coming up soon) but am making it with all its markings as per the book, as I suspect that Hachette will be many months before they give us that part, issue 60 is only for the upper decks stern end.
|
|
|
|
Post by swanrail on Feb 10, 2008 23:38:31 GMT 1
Hi Robert,
You are advised if you have not yet fixed any side planks to make the top one some 5mm higher to give the same effect as my extensions.
However, if like me, you have already fitted the side planks as per Hachette, then the side extensions go on top for the full length of the removable decks.
Note that the bow end will have a piece of ply fitted with the portholes in it, which will finish level with the top of the extension planks, so no need to extend them forward. At the stern end, again there is a piece of ply, and for the aft over the resin part 70/70a I have made the extension plank go round the ply piece (which is some 3 to 4mm inside the resin part), by steaming it around.
If you have not yet fitted your foredeck, and wish to have removable decks, look at recent correspondance/threads in my section of what to do.
Regards
|
|
|
|
Post by matt on Feb 12, 2008 20:24:49 GMT 1
Hello Don. Some good mods being carried out. I also like the pictures of the painted hull with the temp props fitted. Which raised my question. Have you fitted a washer to the rudders just before they enter the tube into the hull? I thought it looked like it in the photo. I also thought it looks like one is fitted in the book?
I have also found a supplier for the micro switches. W5.8 H6.5 D12.8 I think they should fit. Next job the mod to the forecastle.
Matt
|
|
|
|
Post by swanrail on Feb 12, 2008 23:02:50 GMT 1
Hi Matt,
yes you are right, one of the rudders has a washer fitted to it. What happened, when I araldited the tubes into place, unbeknown to me one of the tubes moved whilst the glue was setting (one of the major problems with that type of glue) and being upside down at the time, there was not enough clearance for the rudder to move more than about 20 degrees. Hence the washer has aligned both rudders to the same postion!
|
|
|
|
Post by matt on Feb 21, 2008 11:02:55 GMT 1
Don in the foredeck planking you quote the width at the front as 270mm and not 200mm. Should this be 207mm?
Although I have cut mine at 200mm I have just measured the breakwater middle section again and agree not easy with the book as I made it 206mm. Never mind. I shall refuse anyone to get close to my model with a ruler. Keep up the good work.
Matt
|
|
|
|
Post by afkmatrix on Feb 21, 2008 12:20:40 GMT 1
Hi Matt,
Sorry if this is not what your talking about but if you want to find out where that break water is in David's picture I have found that if you measure from the back of the Foredeck peice 135mm towards the bow then this will get you to where the 20mm peice is. Then measure 30mm towards the stern and this is where the angled peices finish.
Hope that helps.
EDIT: I have been wondering from looking at the Anotomy book what those triangular lines are coming off the hull? You can see them in the picture David has posted, is it just rigging lines or something?
|
|
Deleted
Deleted Member
Posts: 0
|
Post by Deleted on Feb 21, 2008 12:52:16 GMT 1
Umm not sure what their called, but the Bismarck has some poles that can be swung out when manoeuvring close to dock or quay, so that the hull, (or propellers for the stern one) don't get to close to the deck or quay and get damaged. Think what the picture show is those poles and their associated lines. |
|


 I have taken my extra stern ply wood and taped it on and drawn on the front ply wood outline so i can cut that. Then i will approach taking the front foredeck off eek. Now from reading the post where Mark put the water cooling template on the wrong way round and used an iron to loosen the glue I was thinking of trying the same thing with the foredeck? Put some brown paper over it and steam the top of the foredeck and then maybe the edges of it, what do you think will this loosen the glue?
