|
|
Post by Baz on Feb 7, 2008 23:59:05 GMT 1
Hi Afk, I understand. With the 1 layer of Beech on the citidel armour I still have a slight recess. This means my original planking gave me approximately a 1mm step for the belt armour even before the second layer of planking. By all accounts, the second layer of planking supplied by Hachette is 1 mm thick If I put 2 layers of Beech on the citidel armour, I will need to use 1.5mm thickness planking for at least a couple of rows, or follow Trevor's suggestion. I have a bit of housework to do today and some paperwork with son, but after that I will have a play with one of my drawing programs and try to post something showing my options. I'm pleased with the toe rail. Now I just need to get the other bits right. Baz  |
|
|
|
Post by swanrail on Feb 8, 2008 0:32:47 GMT 1
Not quite sure why you should want to second plank the upper part, as if done as per the instructions the hull has the correct shape. Markus originally replaced his top planking with wider ones so as to cover the edges of the decks (which then needed to be reduced in width by about 1.5mm) and I had to use plank extensions as I had already fitted the Hachette planks.
Adding extra planks in the top 2 or 3 inches or so throws the hull out of shape and might look a bit odd when painted.
My model hull is shown in the HULL section of my threads, built as per Hachette, but with upper plank extended. It also has a slope added between the armour belt and the top section.
The full and proper effect can be seen on page 51 of the Anatomy of the Bismarck, if you have it.
Note that the frames as supplied had a built in recess of 1mm to give the correct cross section.
|
|
|
|
Post by Baz on Feb 8, 2008 1:10:00 GMT 1
Hi Swanrail
Take your point and thanks.
But I wanted to include the gunnel as close to scale as possible.
Another alternative would have been to router a +/- 0.8 mm wide groove, 1 mm in from the decking edge and insert a strip rising about 1mm above dck height.
Don't have the tools or steady enough hand for that , so opted for an alternative.
The Beech layer is still almost vertical as I sanded the gunnel into a wedge. Very delicate operation
Baz
|
|
|
|
Post by swanrail on Feb 8, 2008 18:06:10 GMT 1
See Davids solution, which does not need double planking above the armour belt.
As I stated elsewhere on the forum, be careful not to overdo the detail, the end result might not be worth it!!!
|
|
|
|
Post by Baz on Mar 17, 2008 11:46:02 GMT 1
I obviously get confused as to what I should call that small line of metal around the outside of the deck most informed sources call the gunwale. In my diagram I call it the bulwarks. I'm not going to go back and change it now......................  Anyway please I do not have any reference books eg Anatomy of .... but I have been studying numerous photos in preparation for the second planking  ? One way or another I intend to build a gunwale following David's lead. My model is the static version and I already have the deck fixed permanently in place. I have noticed the gunwale seems to move in relation to the edge of the ship depending apon location Amidships the citadel armour has it some way in, yet it seems to be an extension of the vertical outside section towards the bow. At the stern section there seems to be a small lip. Hope the diagram below explains it more simply 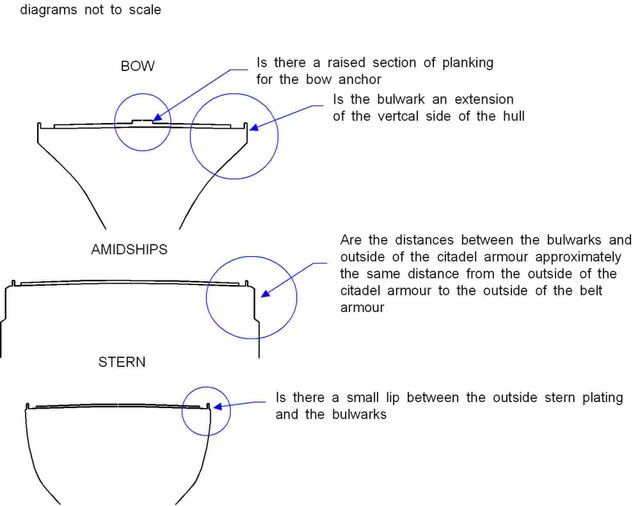 Can anyone offer advice on the correct layout please Thanks guys and gal ( ;)afk) Baz PS A coupla oldies that did not return this year They must have been about 100years old  |
|
|
|
Post by afkmatrix on Mar 17, 2008 13:11:03 GMT 1
Not sure on your questions Baz but if you have no answer by the time I get home (5.30pm) then I will scan in some pictures from my Anatomy Book.
|
|
|
|
Post by nm on Mar 17, 2008 13:20:06 GMT 1
Those penguins look a bit off.
NM
|
|
|
|
Post by david on Mar 17, 2008 16:17:53 GMT 1
Hello Baz, Your second and third drawings are correct however, the vertical lips on the first drawing don't exist (despite Amati/Hachette's view on the matter); the small lip on the bow is similar to that on the stern. Both of these lips are small bevels. The excellent French 1:100 builder shows these features well on page 6 of his site; gemo27.chez-alice.fr/bismarck5.htm . He seems to have worked from a very good set of drawings and his hull corresponds beautifully to the photographs of the real ship. David |
|
|
|
Post by gordon on Mar 17, 2008 20:47:16 GMT 1
That is one impressive model...
|
|
|
|
Post by Greg on Mar 17, 2008 23:53:55 GMT 1
Excellent reference site. The model is fantastic and David is quite right when he says that it corresponds beautifully with photographs of the real ship.
Have listed this site in my favorites and I'll definitely be following the progress of this build.
Greg.
|
|
|
|
Post by Baz on Mar 18, 2008 10:43:23 GMT 1
Those penguins look a bit off. NM  |
|
|
|
Post by Baz on Mar 18, 2008 10:56:01 GMT 1
Hey Afk, any help greatly appreciated  Thank you. And David Your advice and reference is muchly appreciated Still have a few weeks before the second planking, so still straining the brain to find the easiest way around this. www.bismarck-class.dk/technicallayout/anchors/anchors.htmlTake a look at the photo 8 down An interesting bow view. To me there is a small vertical section of hull below the deck edge. Need to find that time machine I have hidden in the wardrobe...  Baz |
|
|
|
Post by Achtung!! on Mar 18, 2008 11:35:22 GMT 1
Those penguins look a bit off. NM Ah ah agent 0062 & 0063 has returned!!! lol But rest assured they are getting the very best care and attention from the dancing girls oopps they are not at boot camp!!! |
|
Deleted
Deleted Member
Posts: 0
|
Post by Deleted on Mar 18, 2008 11:39:31 GMT 1
Dancing Girls should be back by sunday night, London time. |
|
|
|
Post by swanrail on Mar 18, 2008 23:43:38 GMT 1
Not sure if this is what you are getting at, but here is my twopennyworth:
From inboard, going out, we have the deck planks, then the margin planks, next about 3 inches in real money, lower, we have the gutter (naval term scuppers) which is plain painted metal, in which stands the ships side rails, then a another piece of metal again about 3 inches high to contain the water running off the deck (which officially is cambered to allow the water to run into the scupper).
Next outboard is the chamfered edge of the top plate, below which is the chamfered edge of the armour belt.
I served on quite a few merchant ships, and they all had the same scupper arrangement, so the Bismarck is not unique. According to my calculations, the scupper in board and out board is about 0.1mm below the deck and 0.4mm below the outer lip to scale, and in my view not worth modelling, so my model does not show it, nor as far as I can tell, do other models at the same scale.
See Jack Browers book The Anatomy of the battleship Bismarck on page 51 where he shows the cross section amidships at a scale of 200 to 1 (ie our model full scale) and you will need a magnifying glass to see what I have just described, but it is there, believe me!!!!! ;D ;D ;D
|
|